Create a Push Message Campaign
To use Push Message, you must use the following or above SDK versionAndroid 2.33.0 iOS 2.28.0 React Native 3.10.0 Flutter 2.8.0
You can create a new push message campaign by clicking the + Create Campaign button located at the top right of the Push Message menu in the dashboard menu.
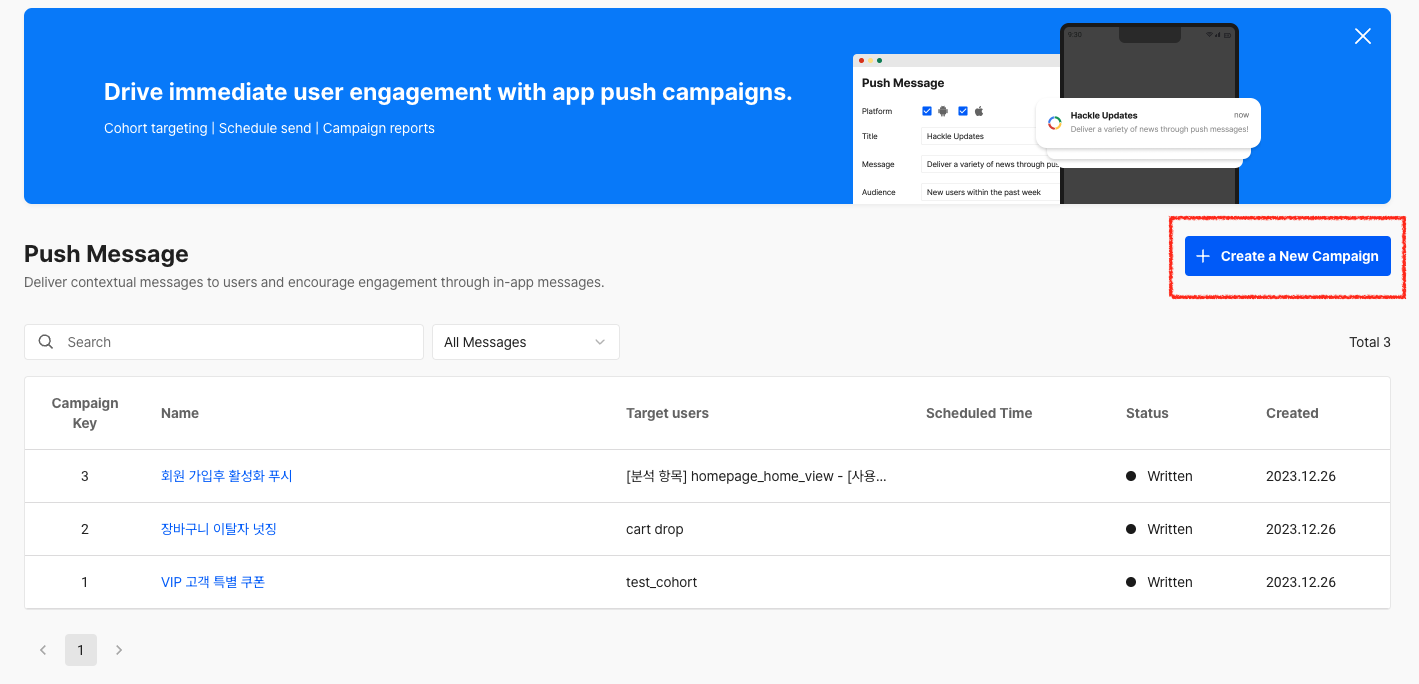
Create Push Message Campaign
Step 1. Campaign Information
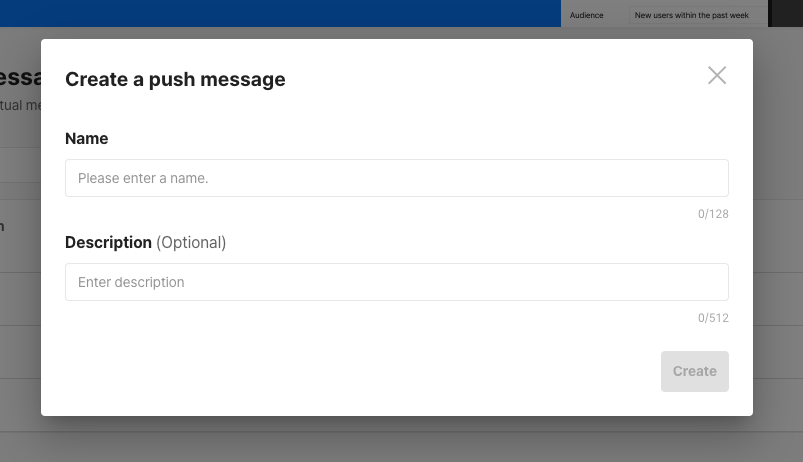
Campaign Information
- Name: A required field where you enter the name of the campaign you want to run.
- Description: An optional field. If there is a description, it will help other team members understand what kind of campaign is being run.
Step 2. Prepare Campaign
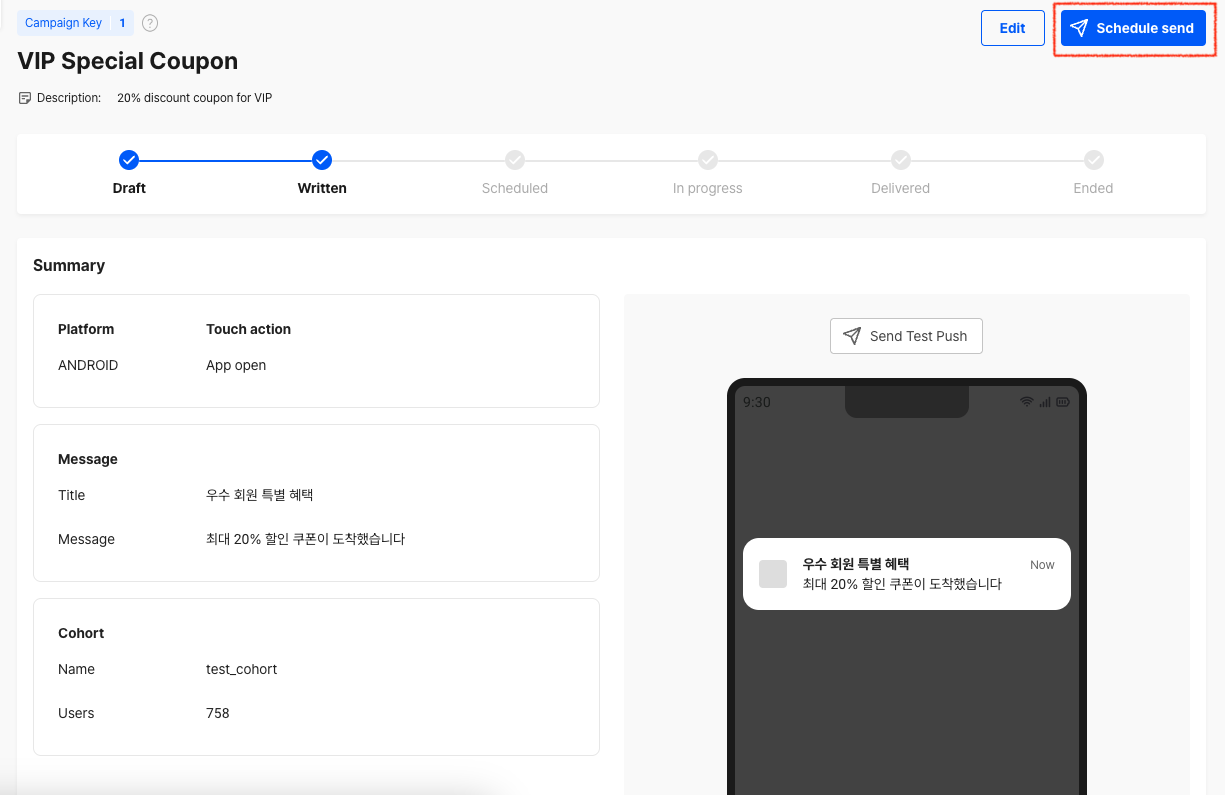
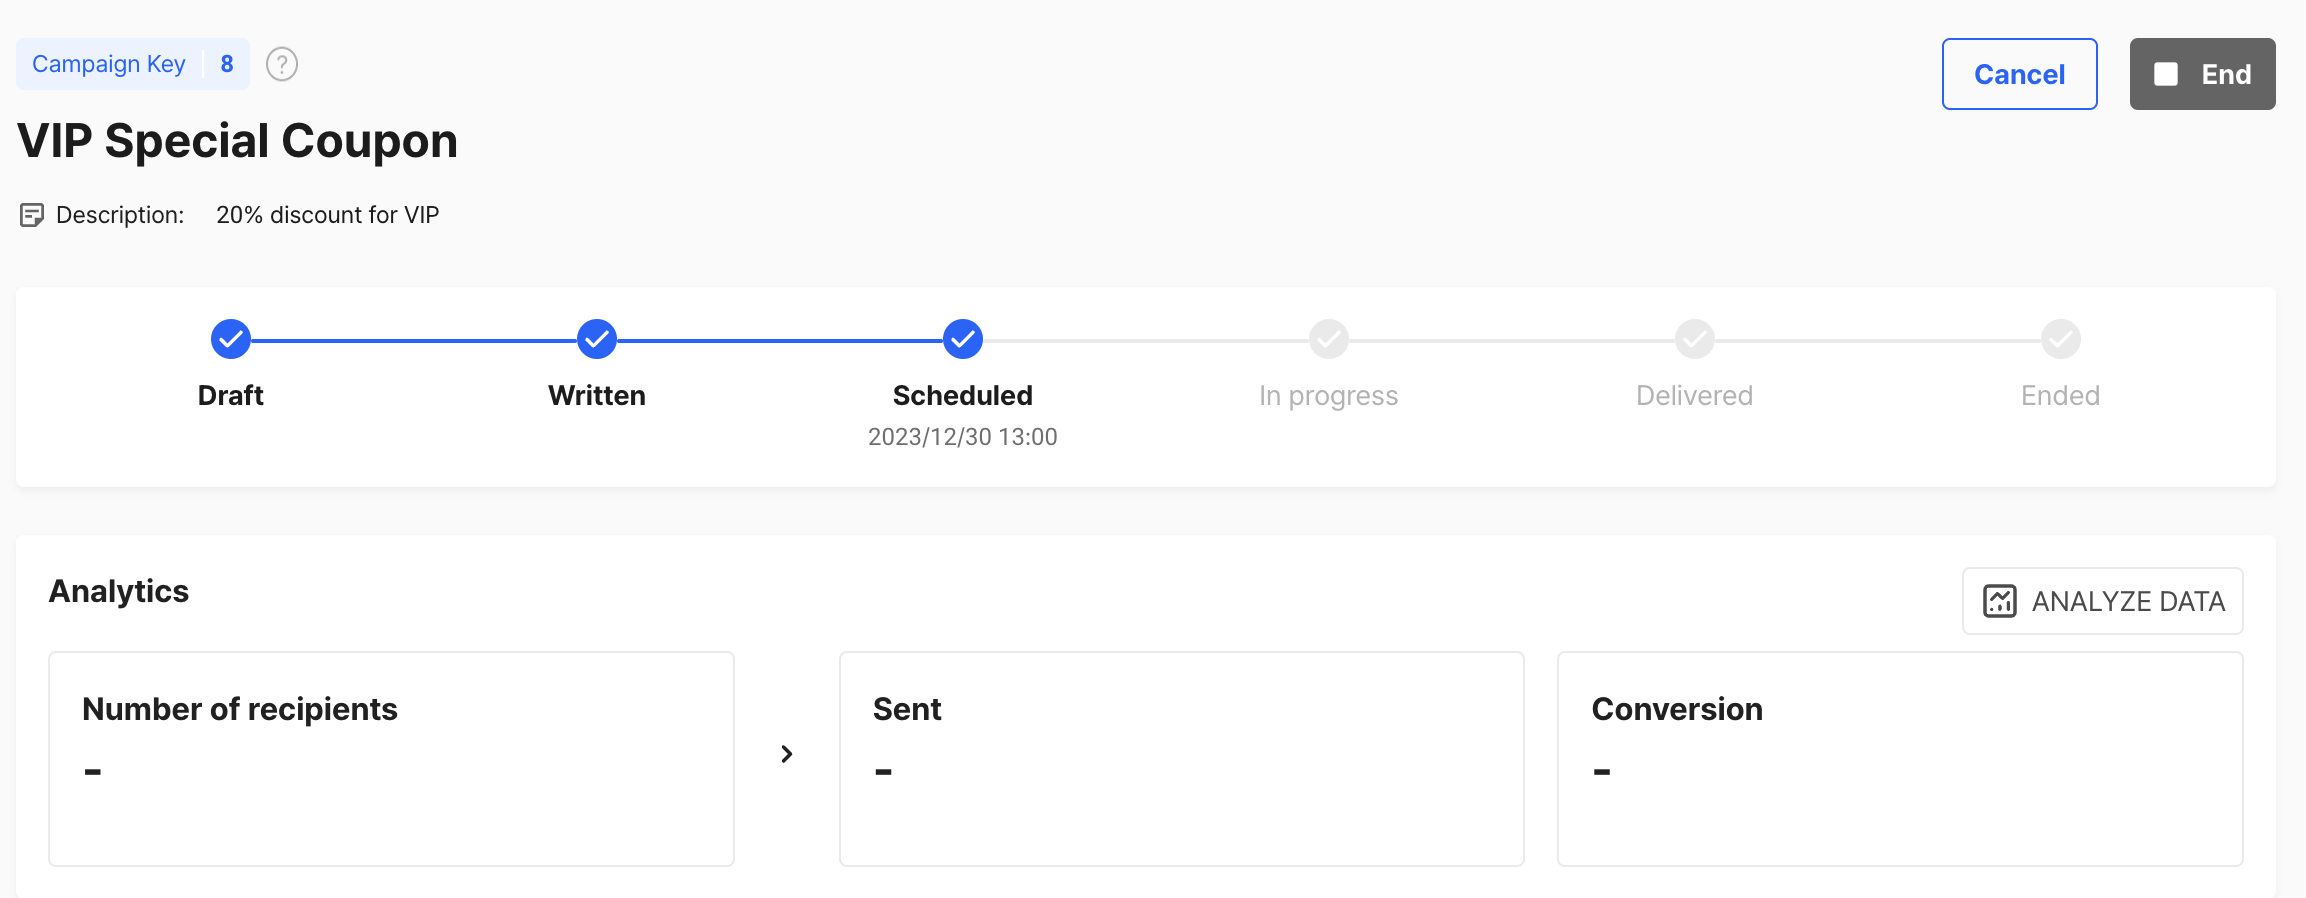
After creating a campaign, you can check the campaign key, title, description, and status.
- Campaign Key: A unique value that distinguishes the campaign, which can be used to extract users exposed to a specific campaign.
- Campaign Title/Description: You can modify the title and description.
- Campaign Status: When you first create a campaign, its status is 'Draft'. After writing the detailed campaign content and saving it, you can start the campaign. To modify the campaign content, click the Edit button to change the status back to 'Draft'.
2-1. Write Message
You can set the platform environment where the message will be sent and the message content.
Firebase and APN integration settings are required to use push messages.If the integration has not been done yet, please check the Android Push Message Setup iOS Push Message Setup guides.
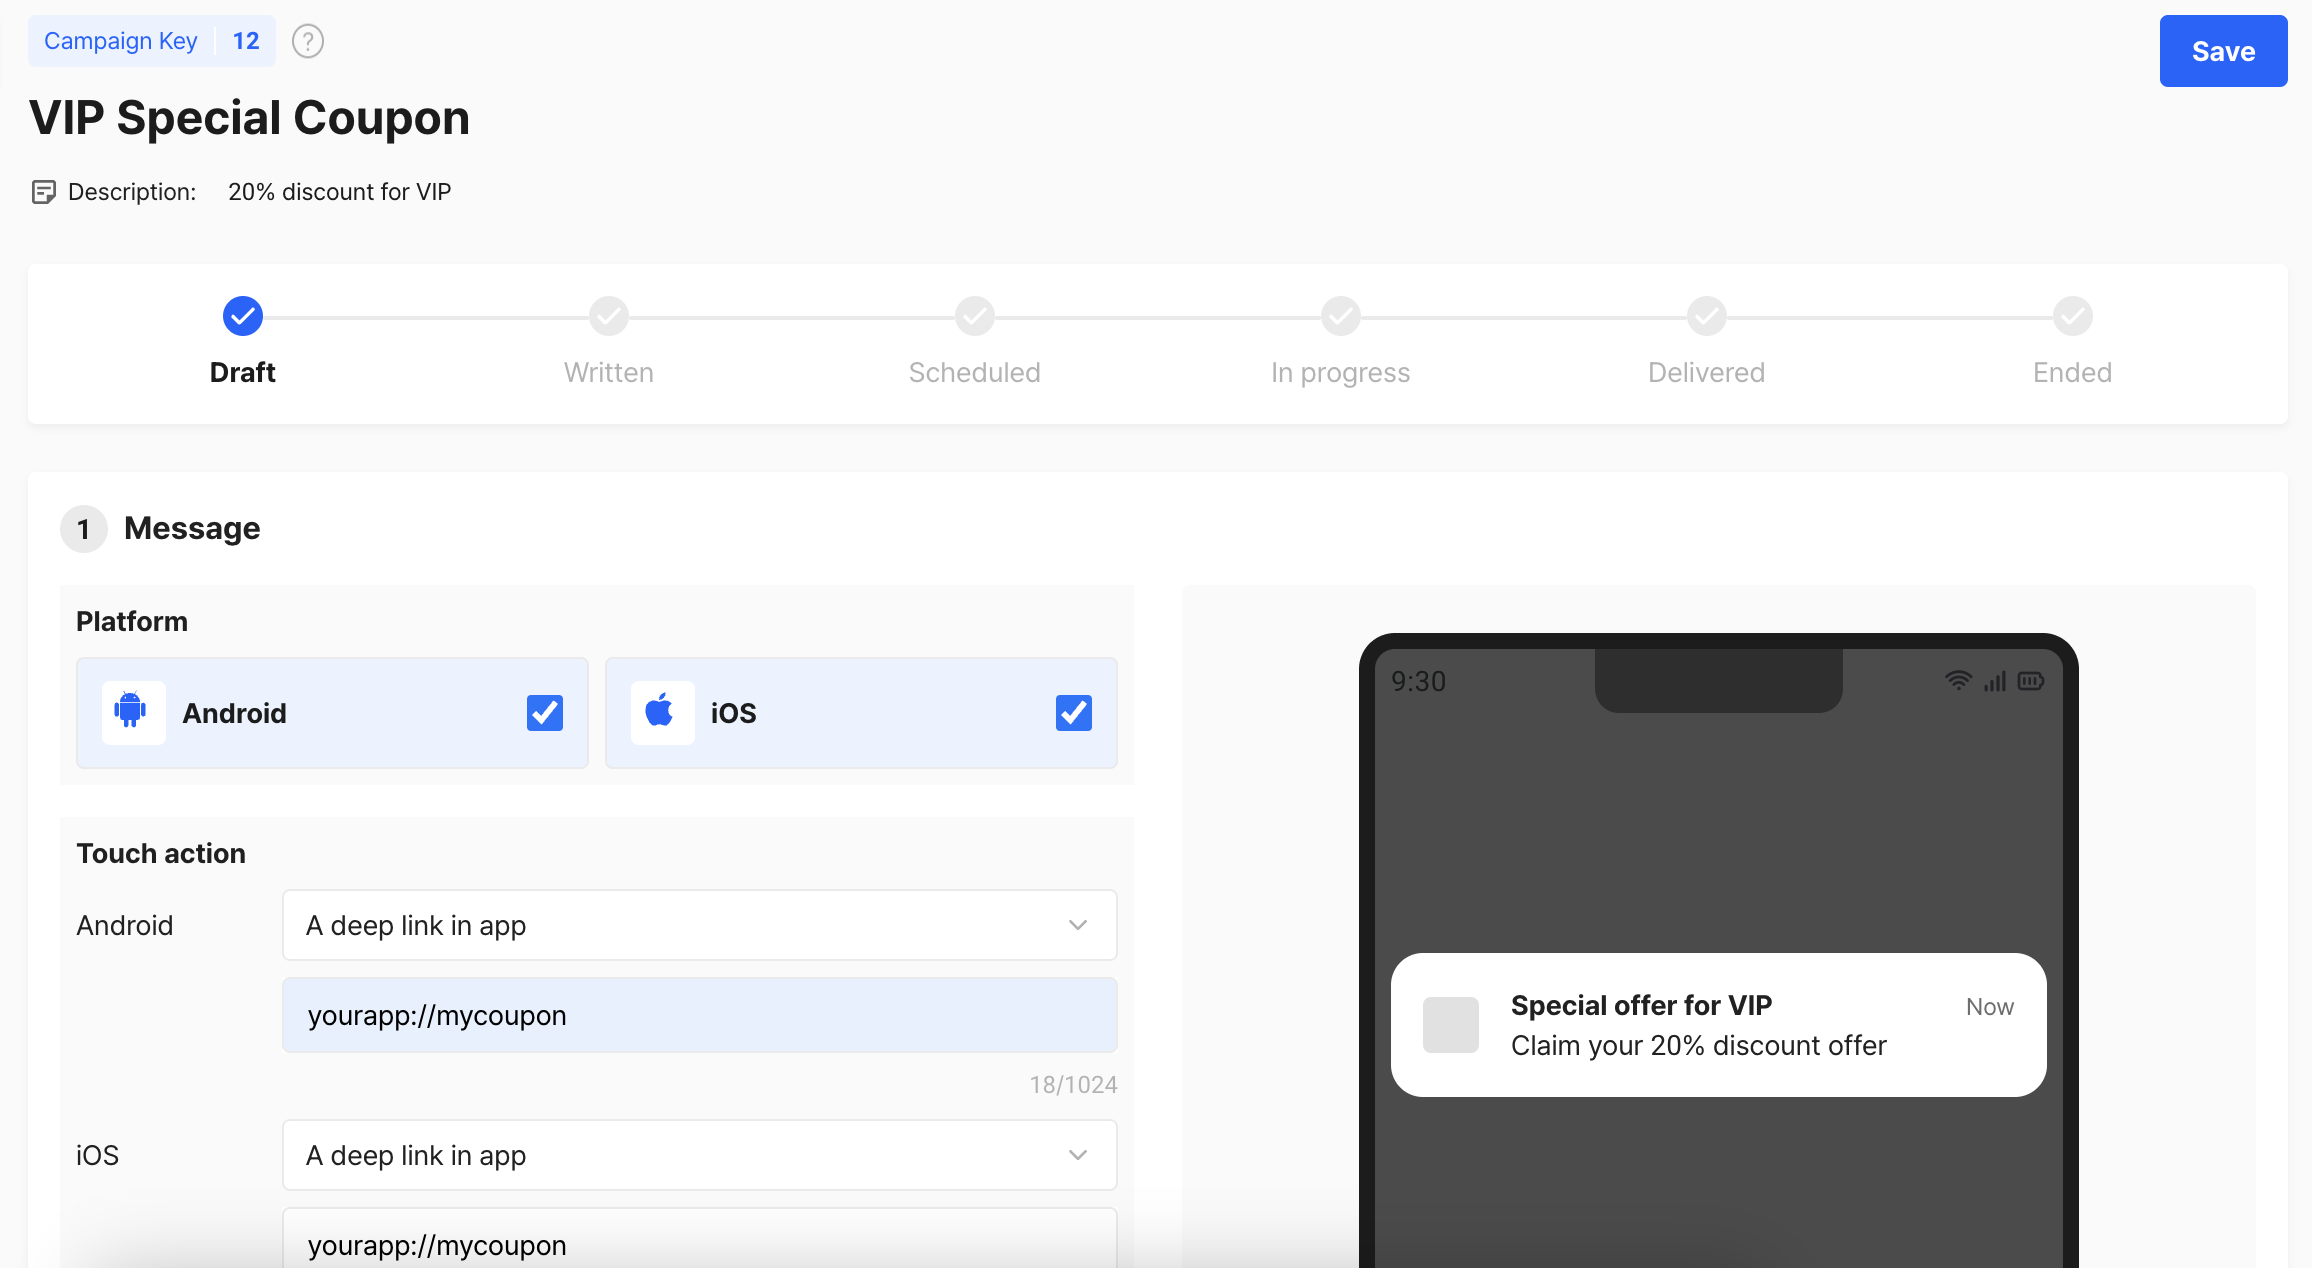
Platform and Message Settings
- Supported Platforms
- App: Android, iOS
- Web (coming soon)
- Click Action
- Open App
- Open App and Go to Link
- Link: Max 1024 characters
- Content
- Title: Max 30 characters
- Body: Max 30 characters
- The entered content is displayed as a preview on the right side of the screen.
- For promotional messages, please refer to the App Push Advertising Guidelines from the Korea Internet & Security Agency and ensure compliance.
2-2. Write Personalized Message
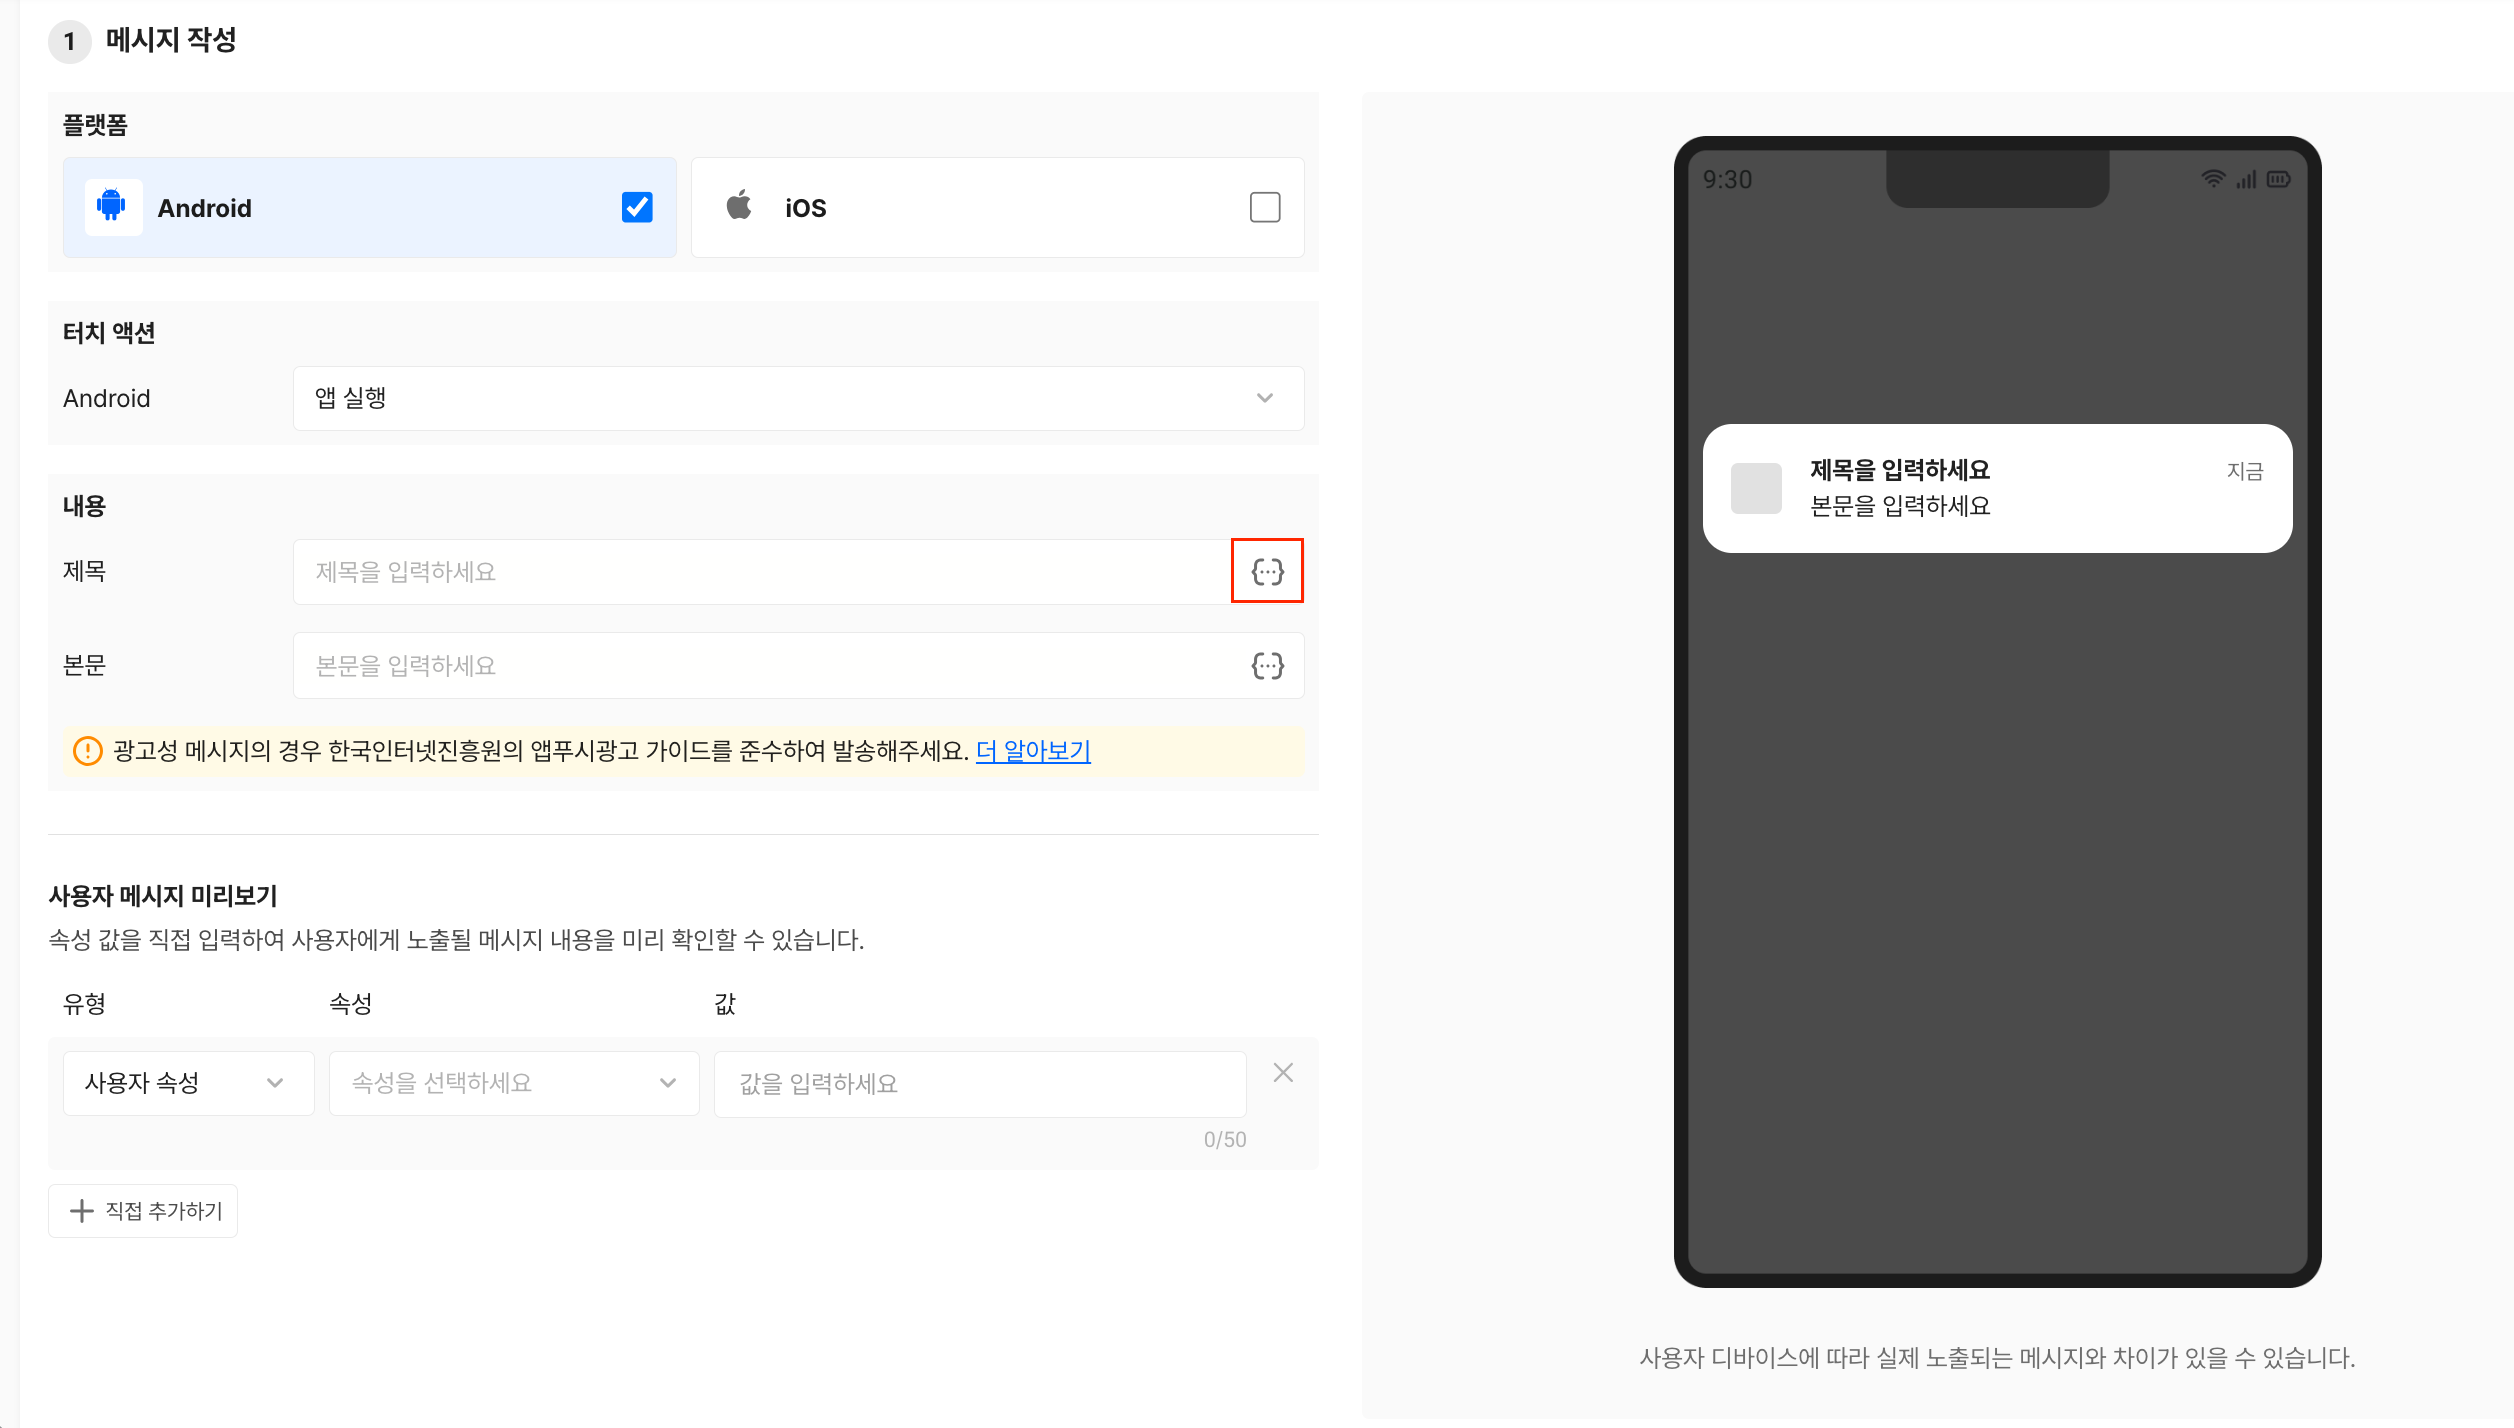
Go to Write Personalized Message
- Click {...} to write a personalized message.
You can set the title and body.
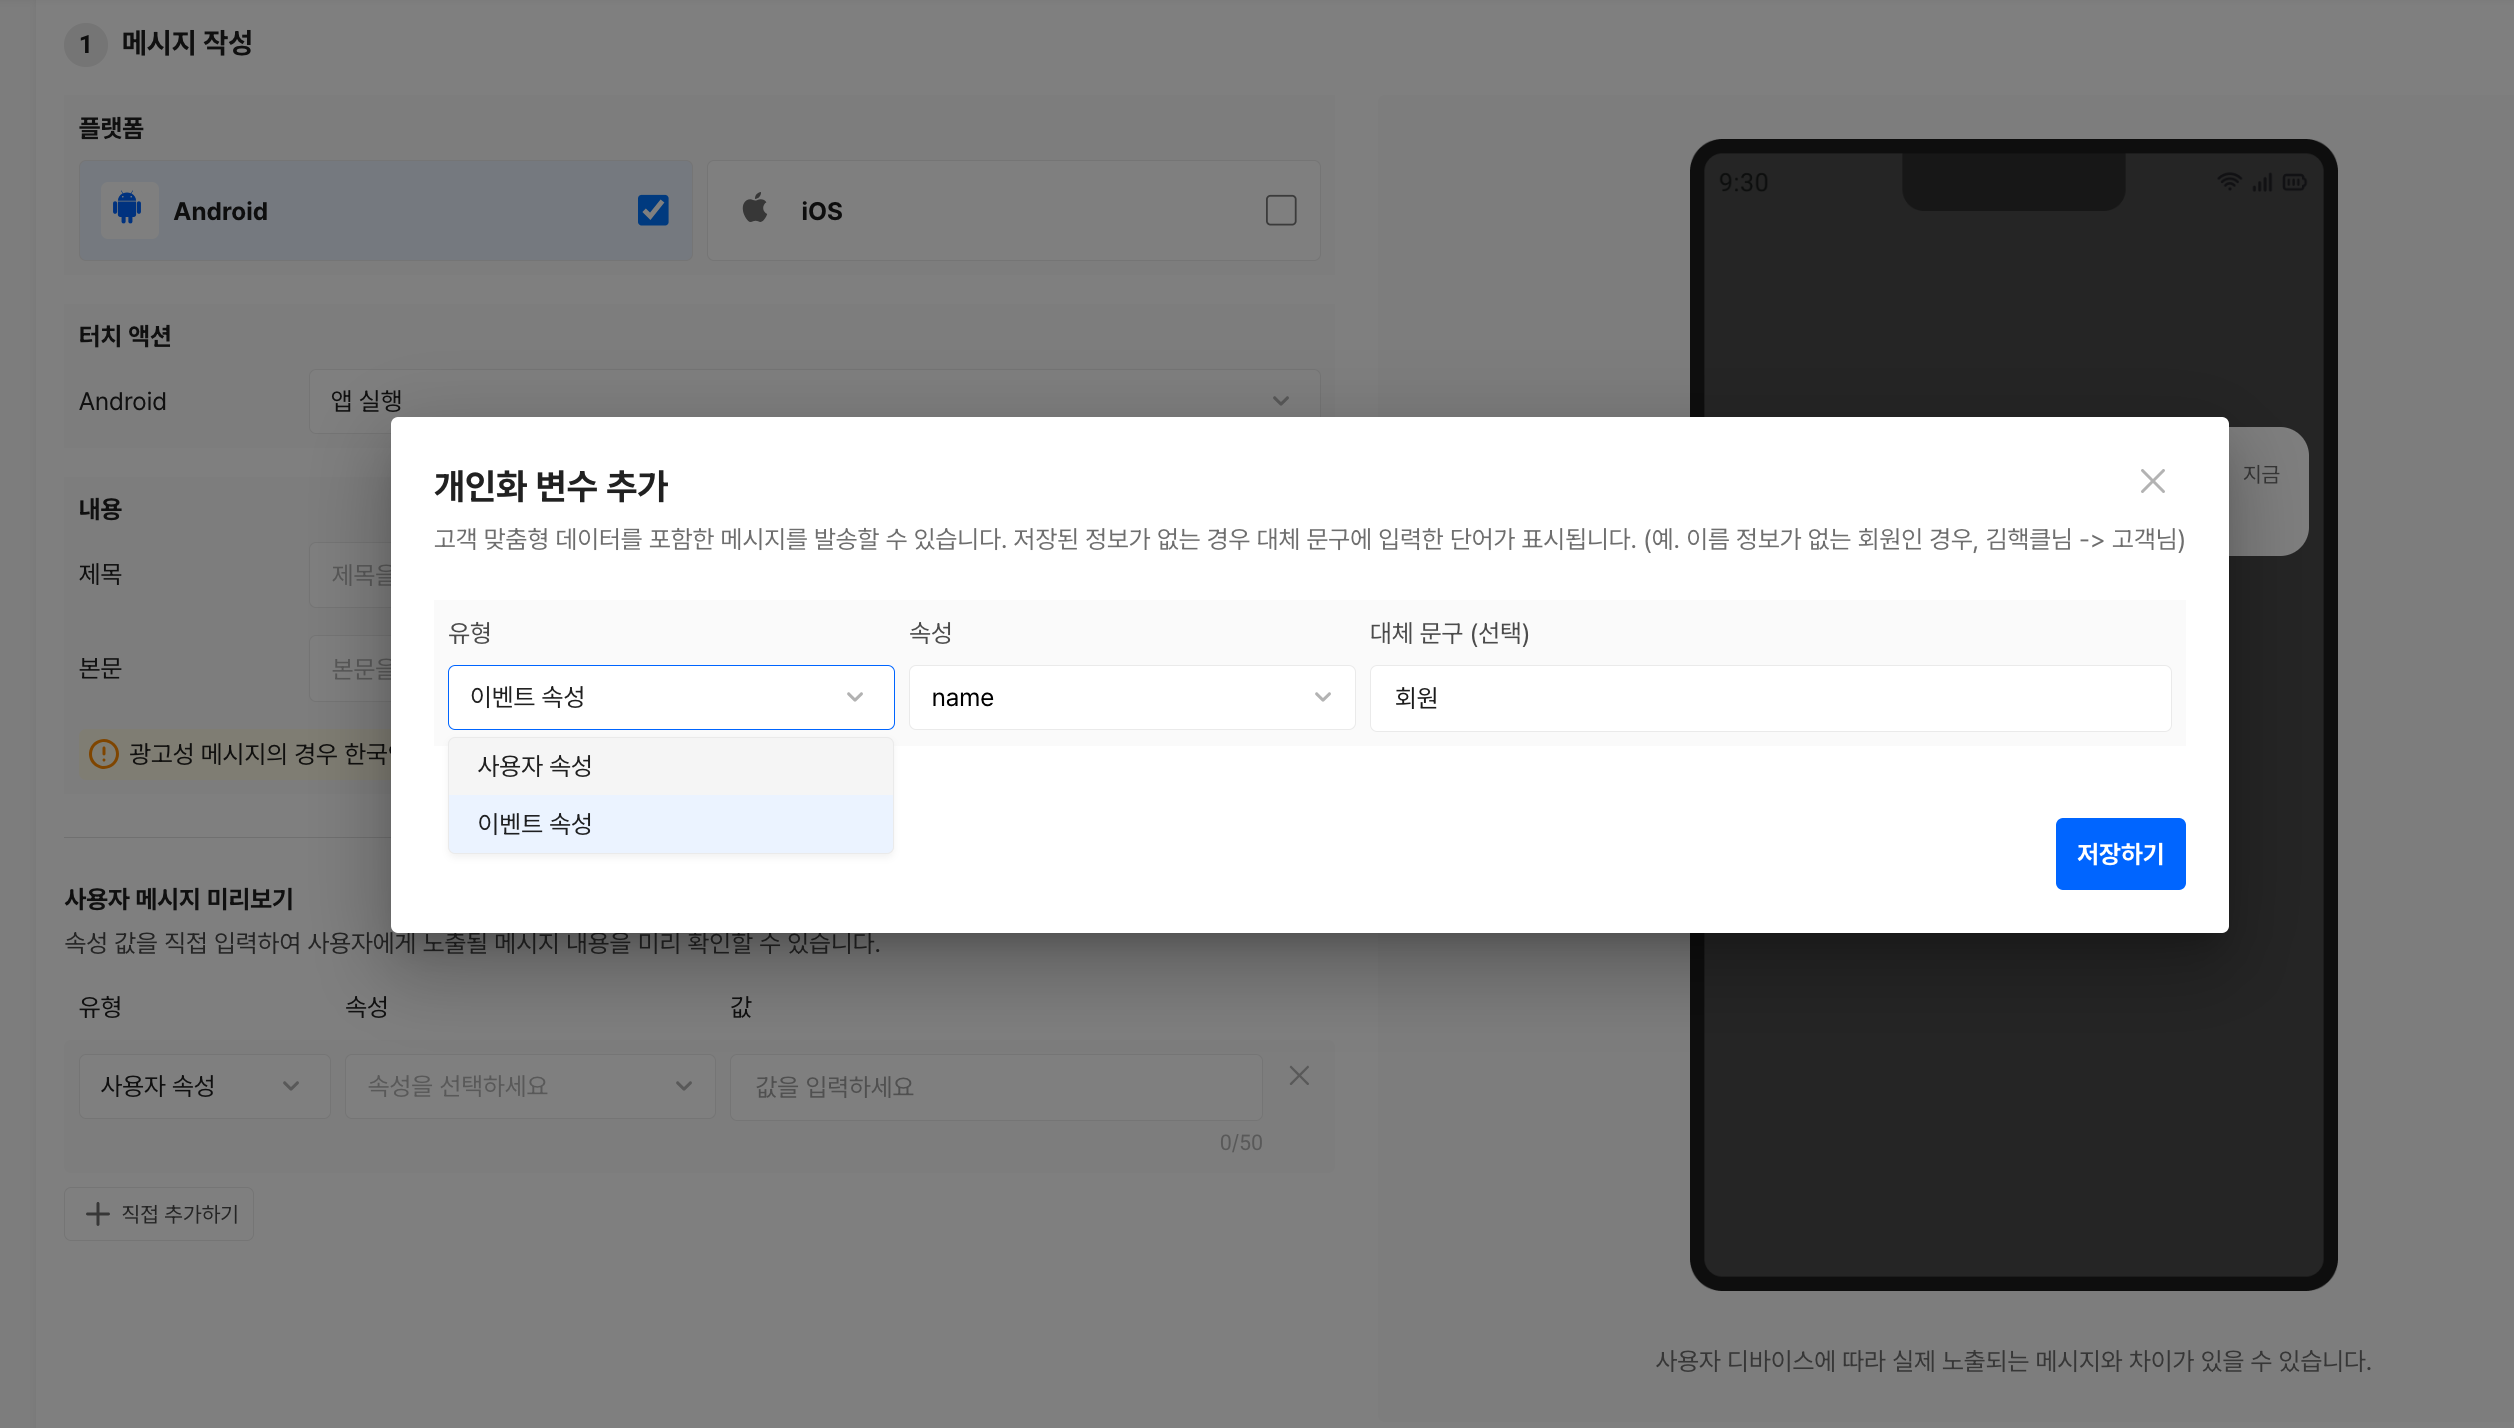
Detailed Personalized Message Settings
- In the popup, you can select Event Properties and User Properties, and if there is no value for each property, you can set a Fallback Message to determine how it will be displayed.
For example, if you select the account_name property, the user's name "Hackle" will be displayed, and if there is no name, the fallback message you entered will be shown.
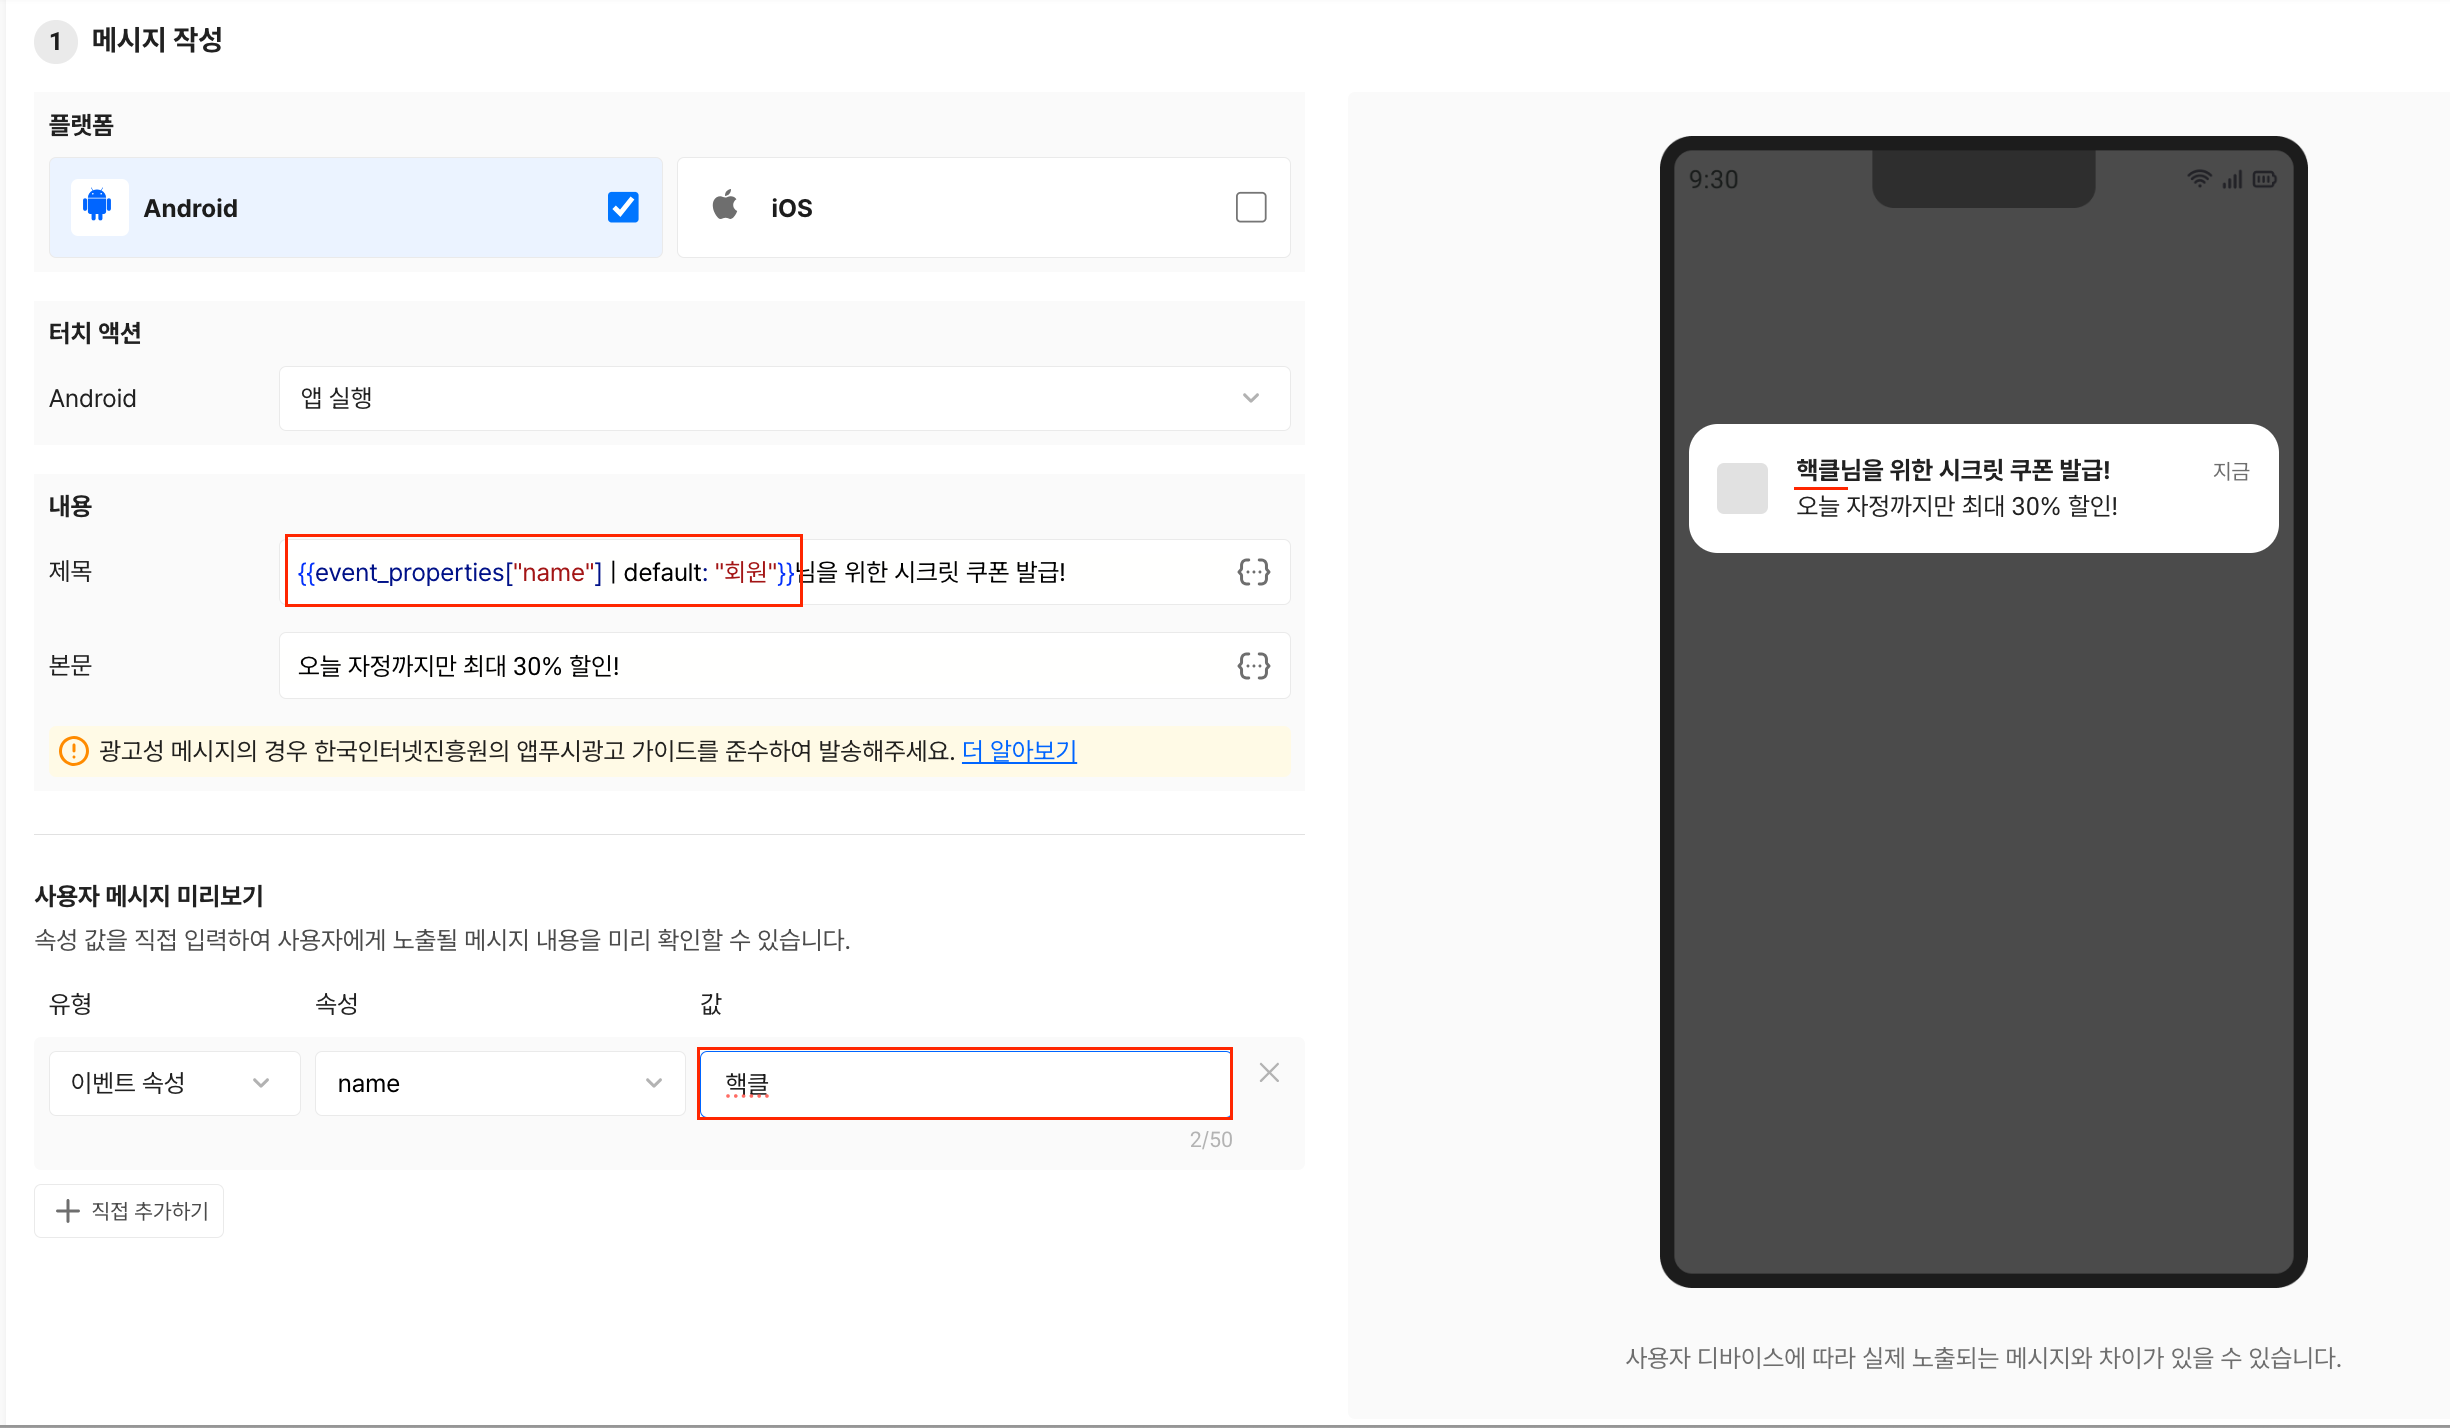
Check and Preview Personalized Message
- Check the personalized message you set in the popup, and enter a value in the Preview Message as User below.
You can immediately see how the push message will look on the device screen on the right.
2-3. Set Target Audience
-
You can target the campaign audience by specifying a cohort. Use various events/properties to set the desired cohort. For instructions on using cohorts, please refer to the Create Cohort document.
-
You can find various cohort templates commonly used by industry in the Recommended Push Message Templates.
-
If there are no issues in the preview, and you have set the campaign target, click Save to proceed to the next step.

Set Target
Step 3. Review Campaign
You can review the summary information of the created campaign.
In addition to the message content, you can also preview the number of users in the cohort set as the target.
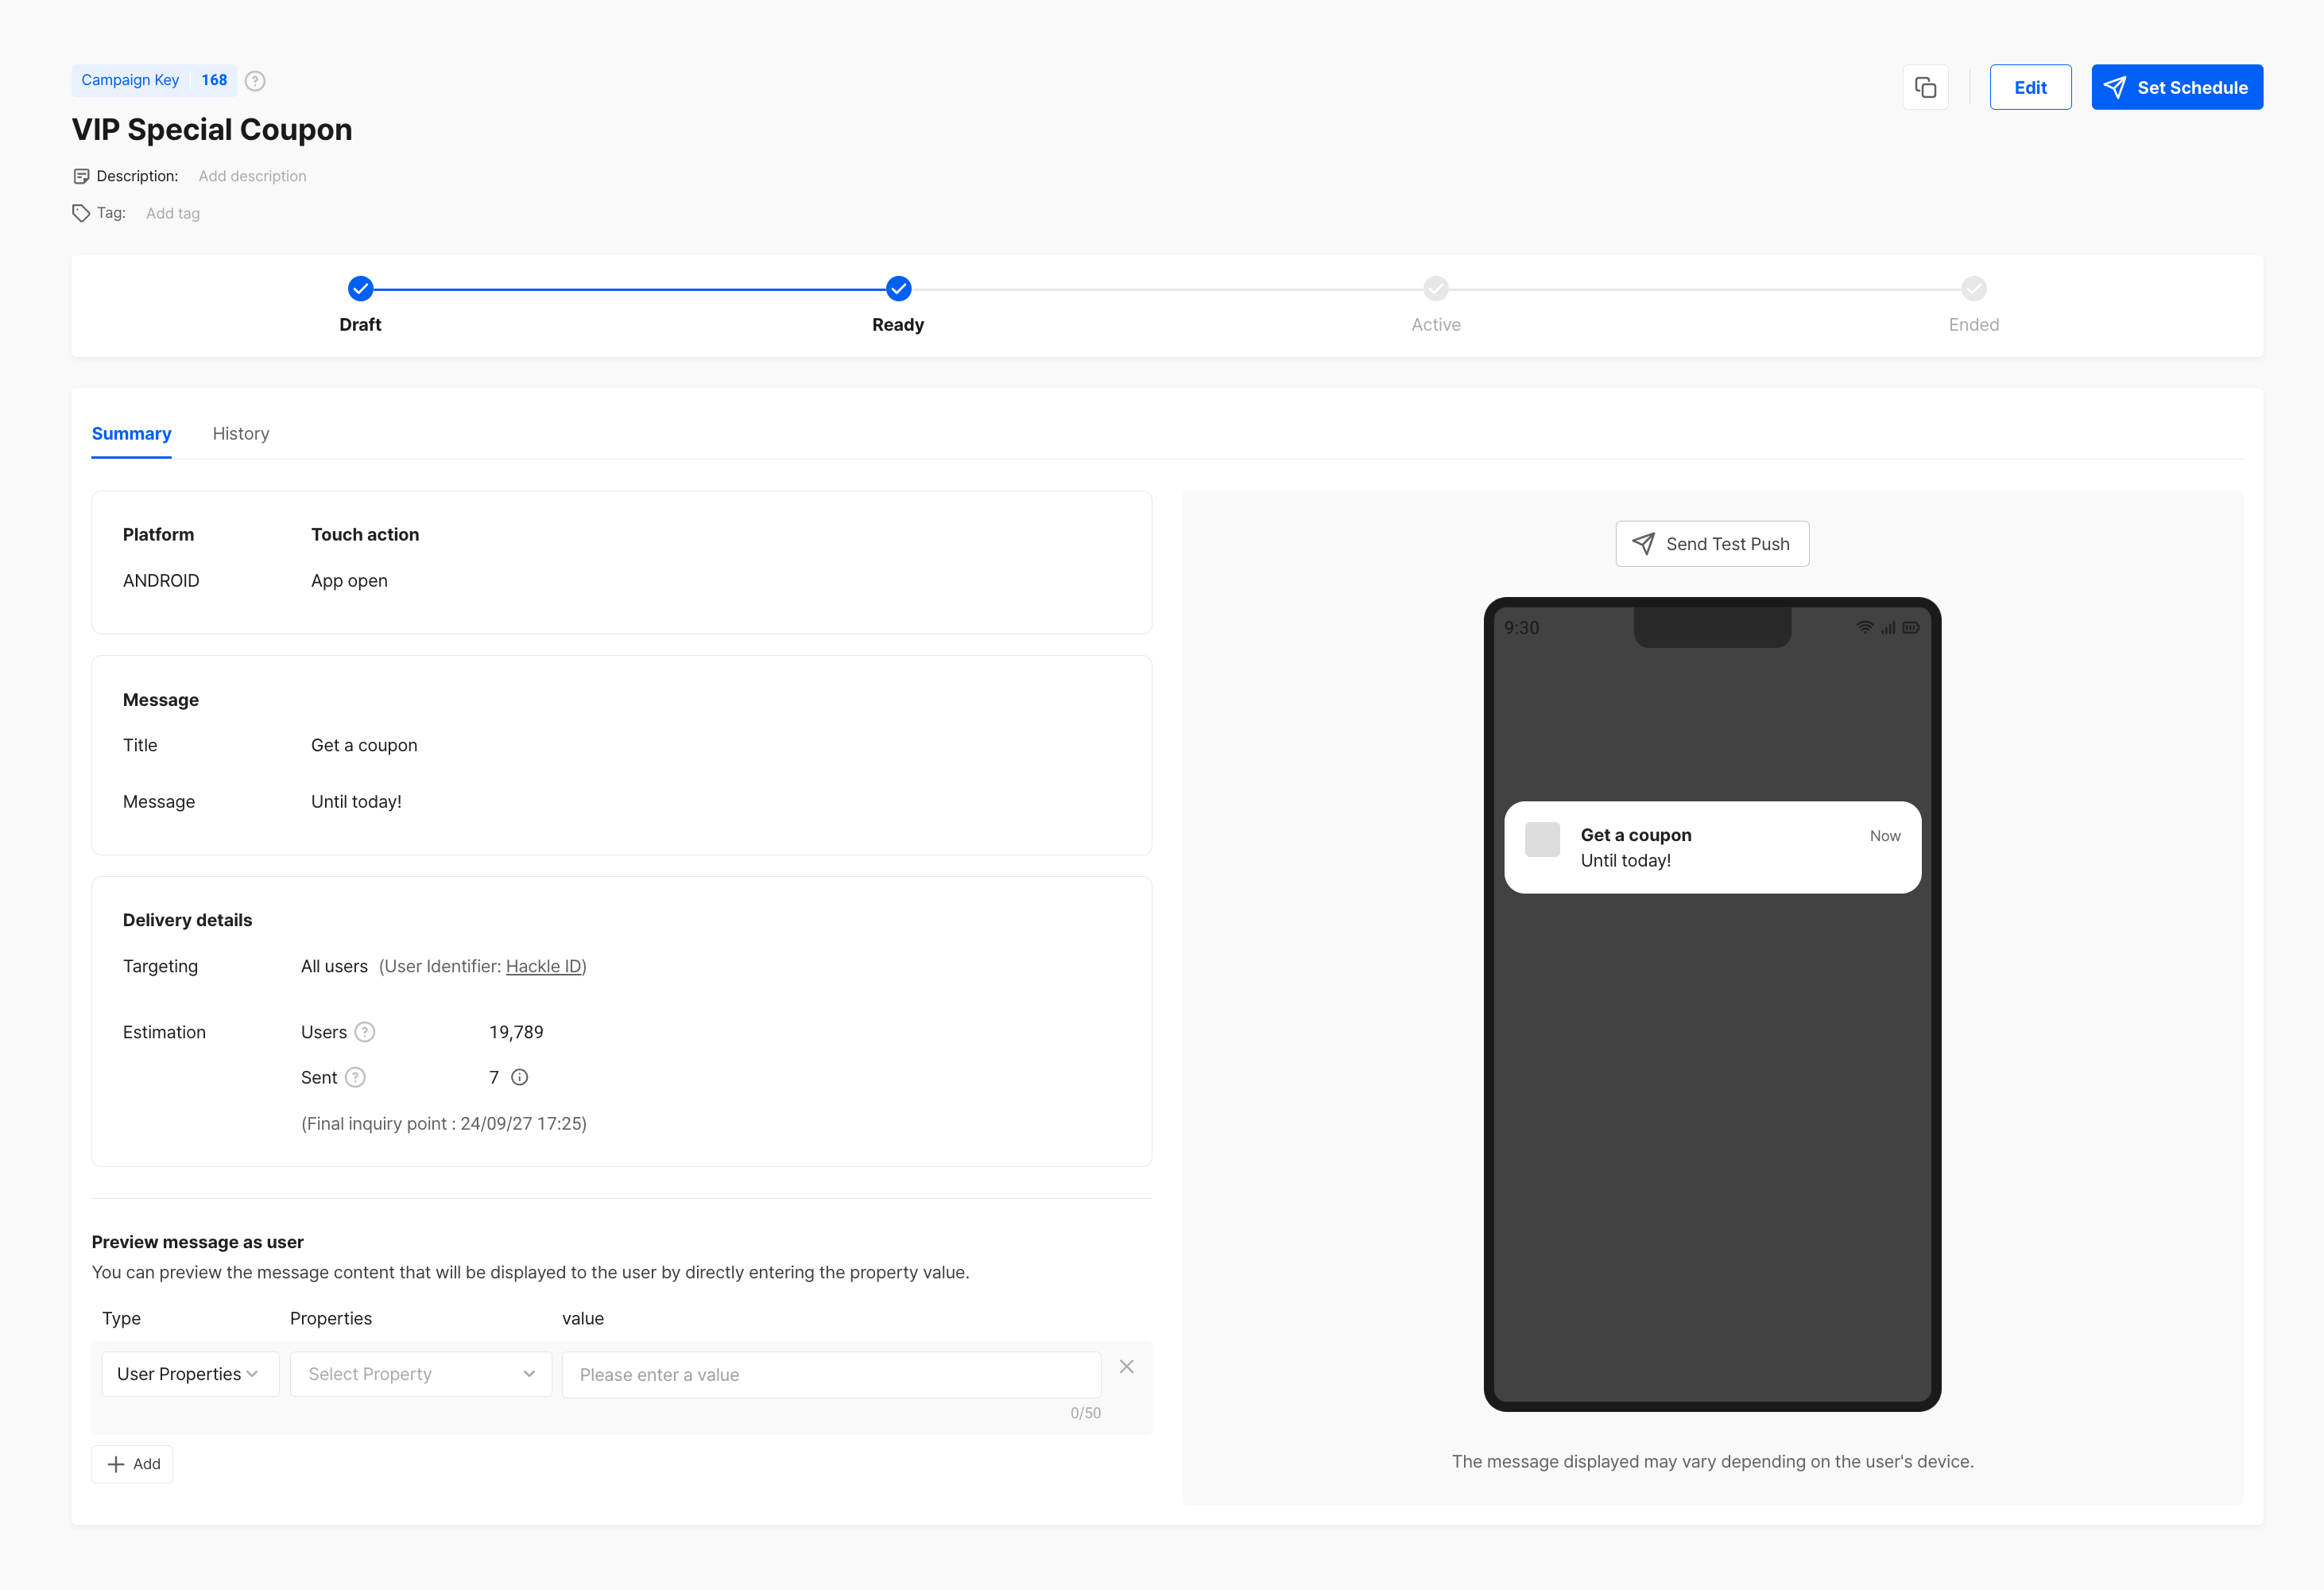
3-1. Test Send
You can preview the configured message on the right side of the screen.
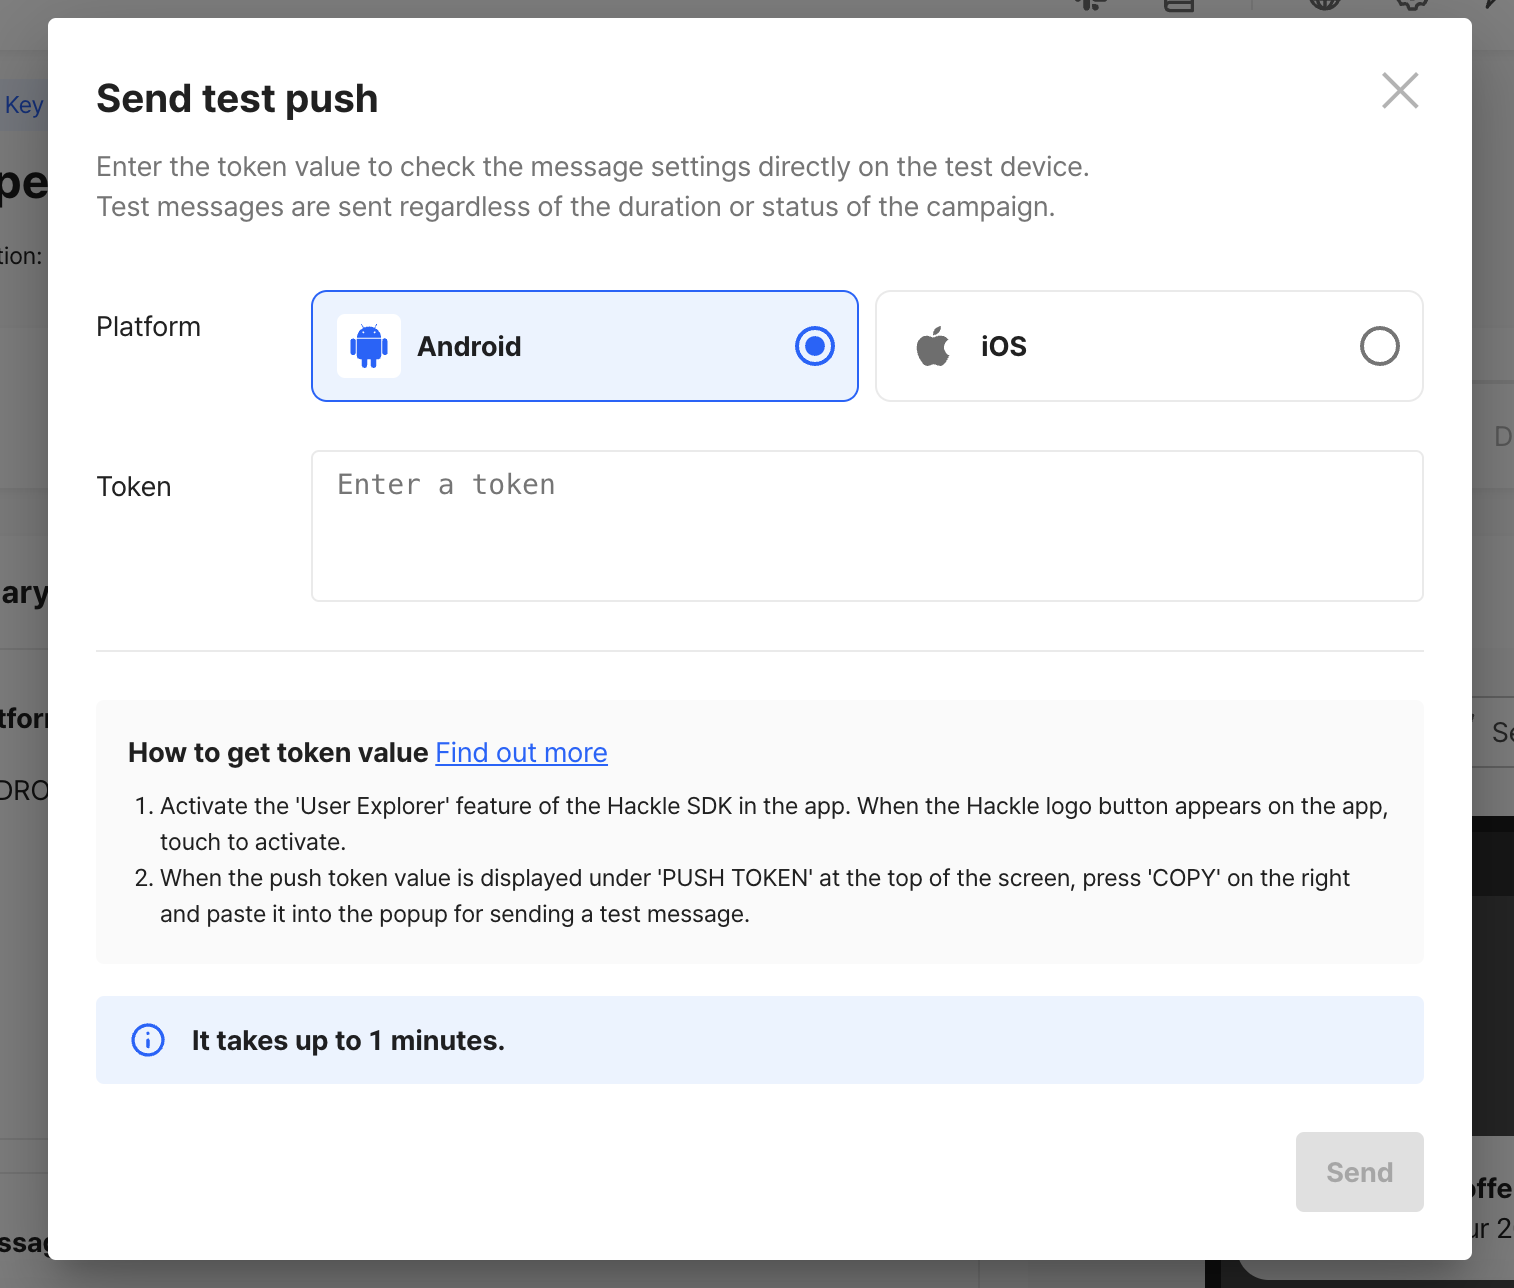
If you want to receive the push message on an actual device in advance, click the Test Send button.
In the test send popup, you need to select the platform and enter the push token value of the device where you want to receive the message.
For how to check the push token, please refer to the User Explorer document.
Enter Push Token
After entering the token value and clicking the Send button, the push message will be sent to the device corresponding to that token value, as shown below. Check not only the message content but also the action that occurs when clicked.
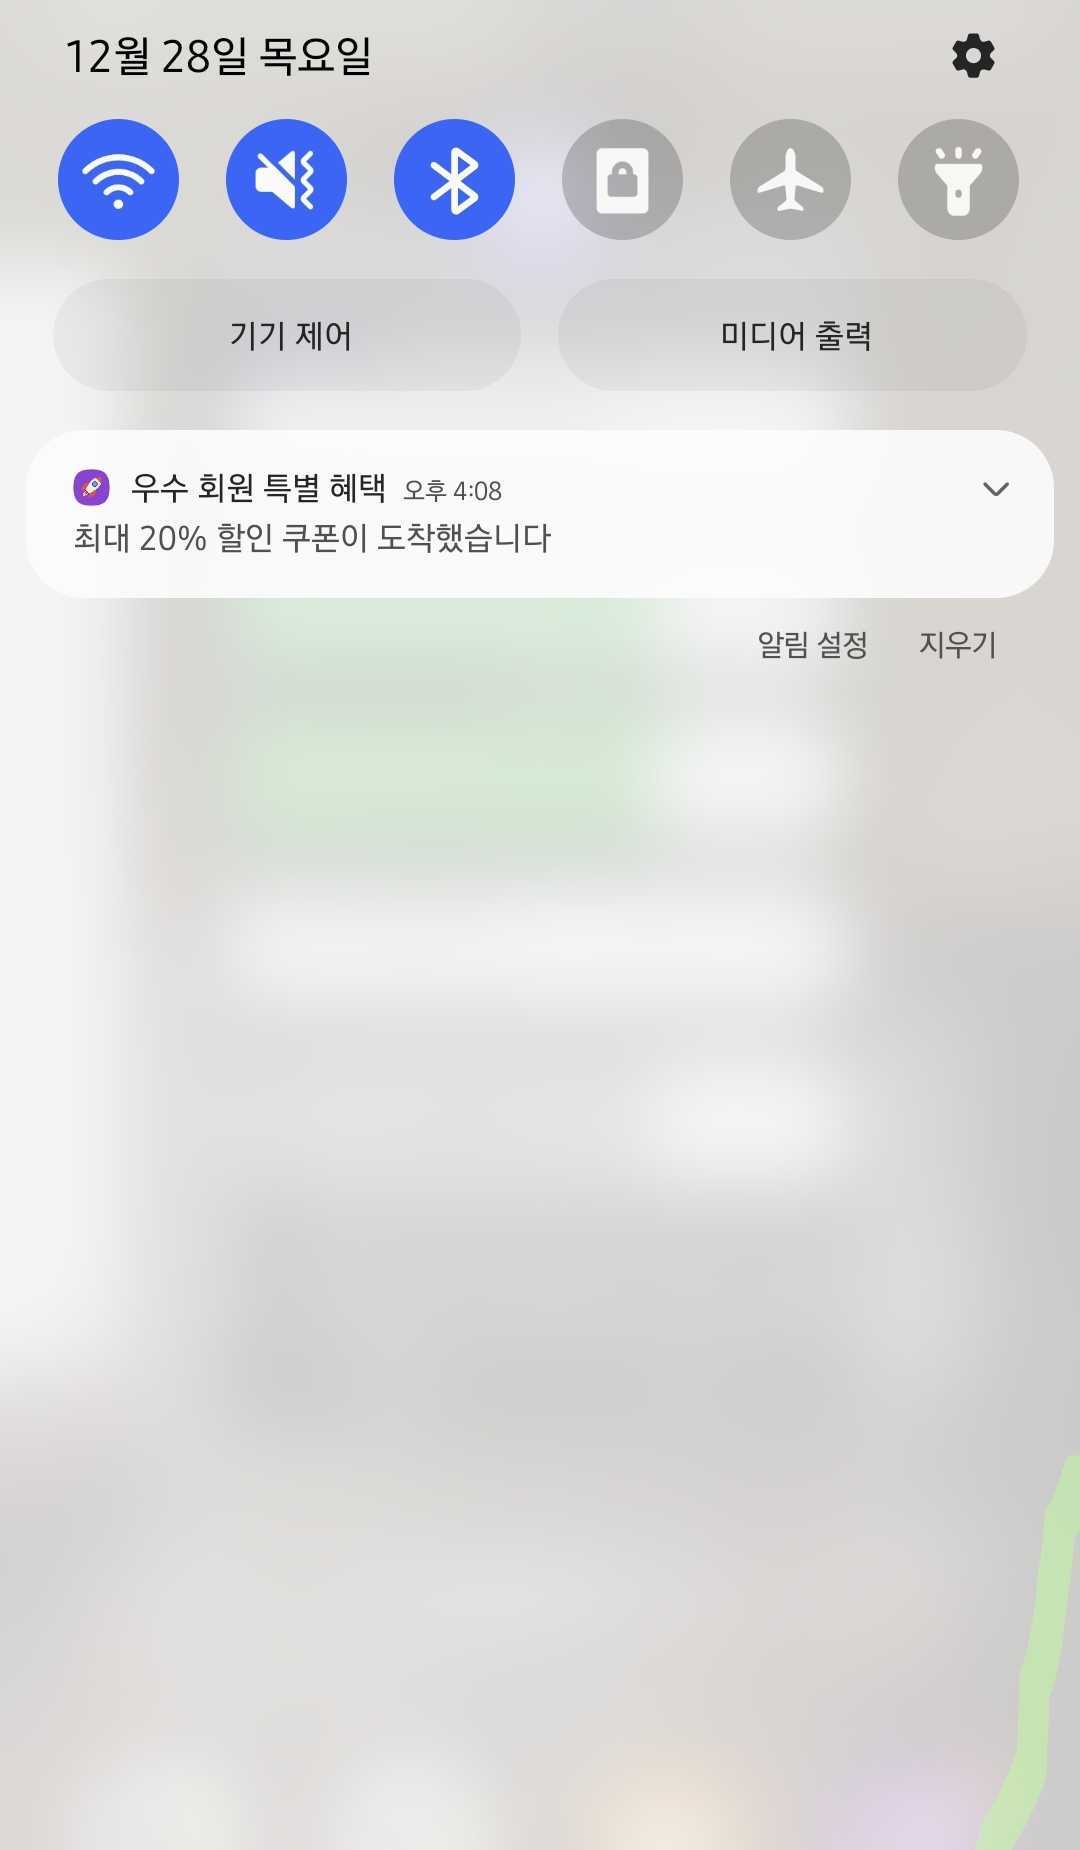
Test Sent Push Message
Step 4. Set Delivery Schedule
When everything is ready, click the Schedule Delivery button in the top right corner to set the period during which the message will be sent.
Schedule Delivery Button
In the schedule setting popup, you can set the desired schedule type.
It supports immediate delivery, scheduled delivery, repeated delivery based on schedule, and event-based delivery.
4-1. Immediate Delivery
Sends a push message immediately to users in the cohort.
It is suitable for delivering urgent announcements or updates on ongoing events.
You can double-check the number of users in the cohort set as the target before sending. It may take a few minutes for the message to be actually sent to users after scheduling the delivery.
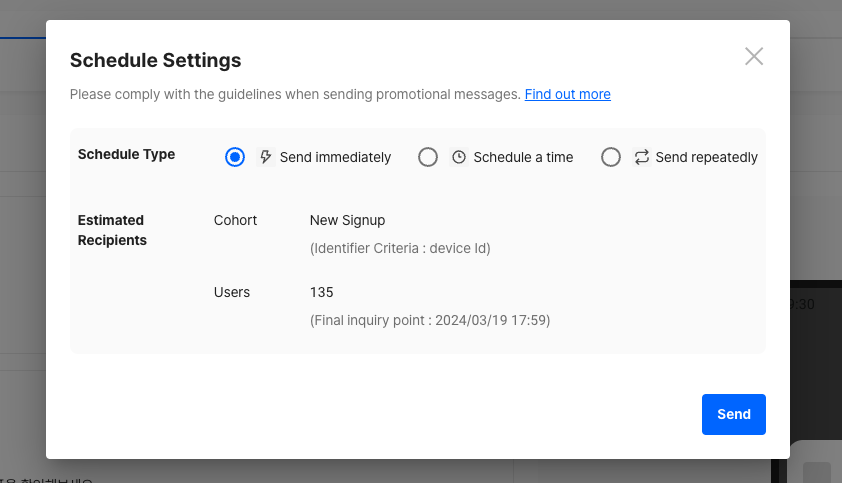
Send Immediately
4-2. Scheduled Delivery
Sends a message to users in the cohort at a desired time. You can specify the desired time zone.
You can double-check the number of users in the cohort set as the target before sending. It may take a few minutes for the message to be actually sent to users at the scheduled time.
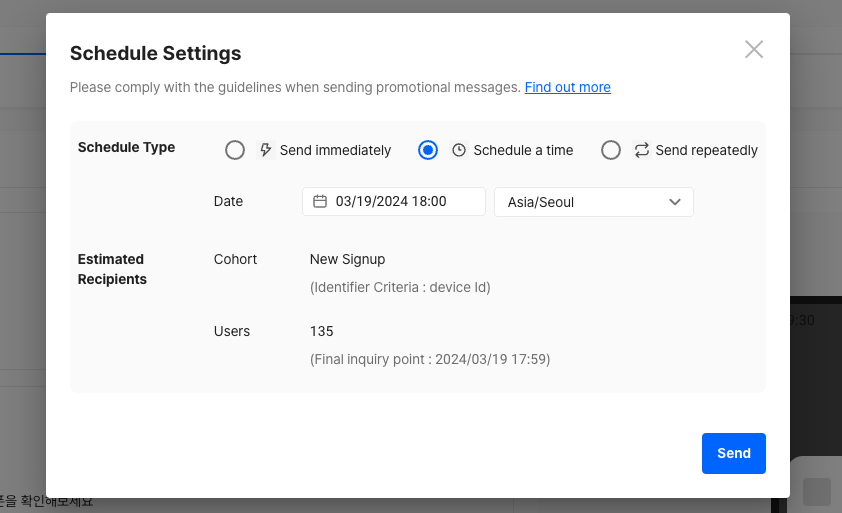
Schedule Delivery
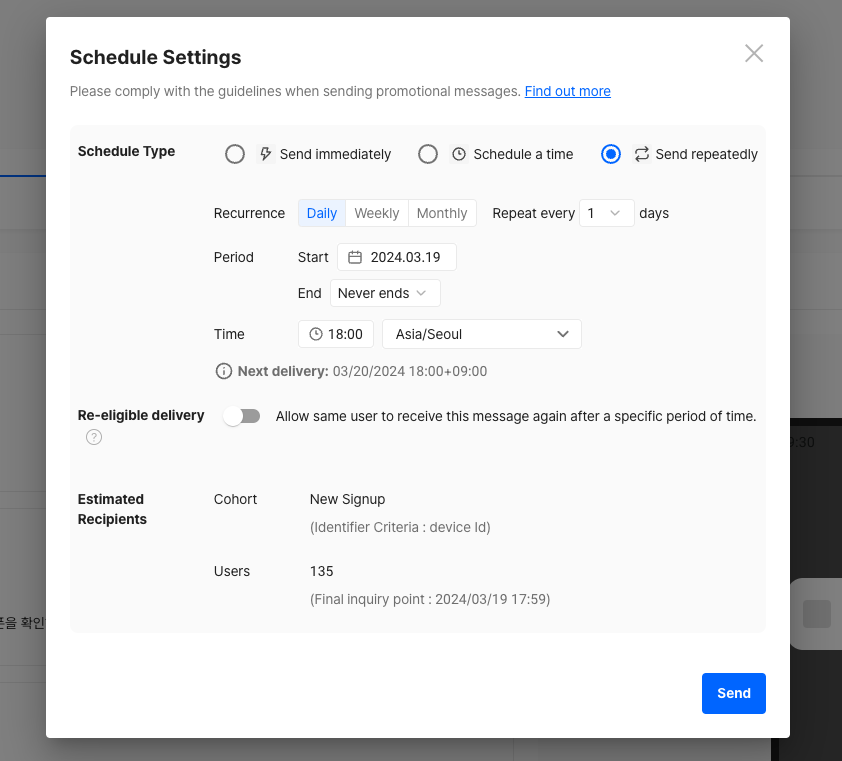
4-3. Repeated Delivery
Sends the same message repeatedly to users in the cohort on a periodic basis. You can set complex schedules, and the next delivery date is automatically calculated and displayed whenever the conditions are changed.
You can double-check the number of users in the cohort set as the target before sending. It may take a few minutes for the message to be actually sent to users at the scheduled time.
Repeated Delivery
- Campaign Period
- Start: Set the start date and time for delivery.
- End
- No End: Do not specify an end date. In this case, you need to manually end the campaign.
- Until a Specific Date: Set a desired end date.
- Until a Specific Number of Occurrences : Automatically ends after the specified maximum number of deliveries.
- Delivery Frequency
- Day: Repeat daily or every few days.
- Week: Repeat on specific weekdays, such as every Tuesday or every other Tuesday and Thursday.
- Example: If today is Wednesday, and you set it to send every other Tuesday and Thursday, it will send this Thursday, skip next Tuesday and Thursday, and send again on the following Tuesday and Thursday.
- Month: Repeat on a specific day of the month, such as the 5th of every month or every other month.
- Re-eligible Delivery
- By default, the same campaign is sent only once to the same user.
- If you want to allow duplicate delivery, you can set the interval (in minutes, hours, days, weeks, or months) after which the message can be resent to the same user, minimizing negative user experiences.
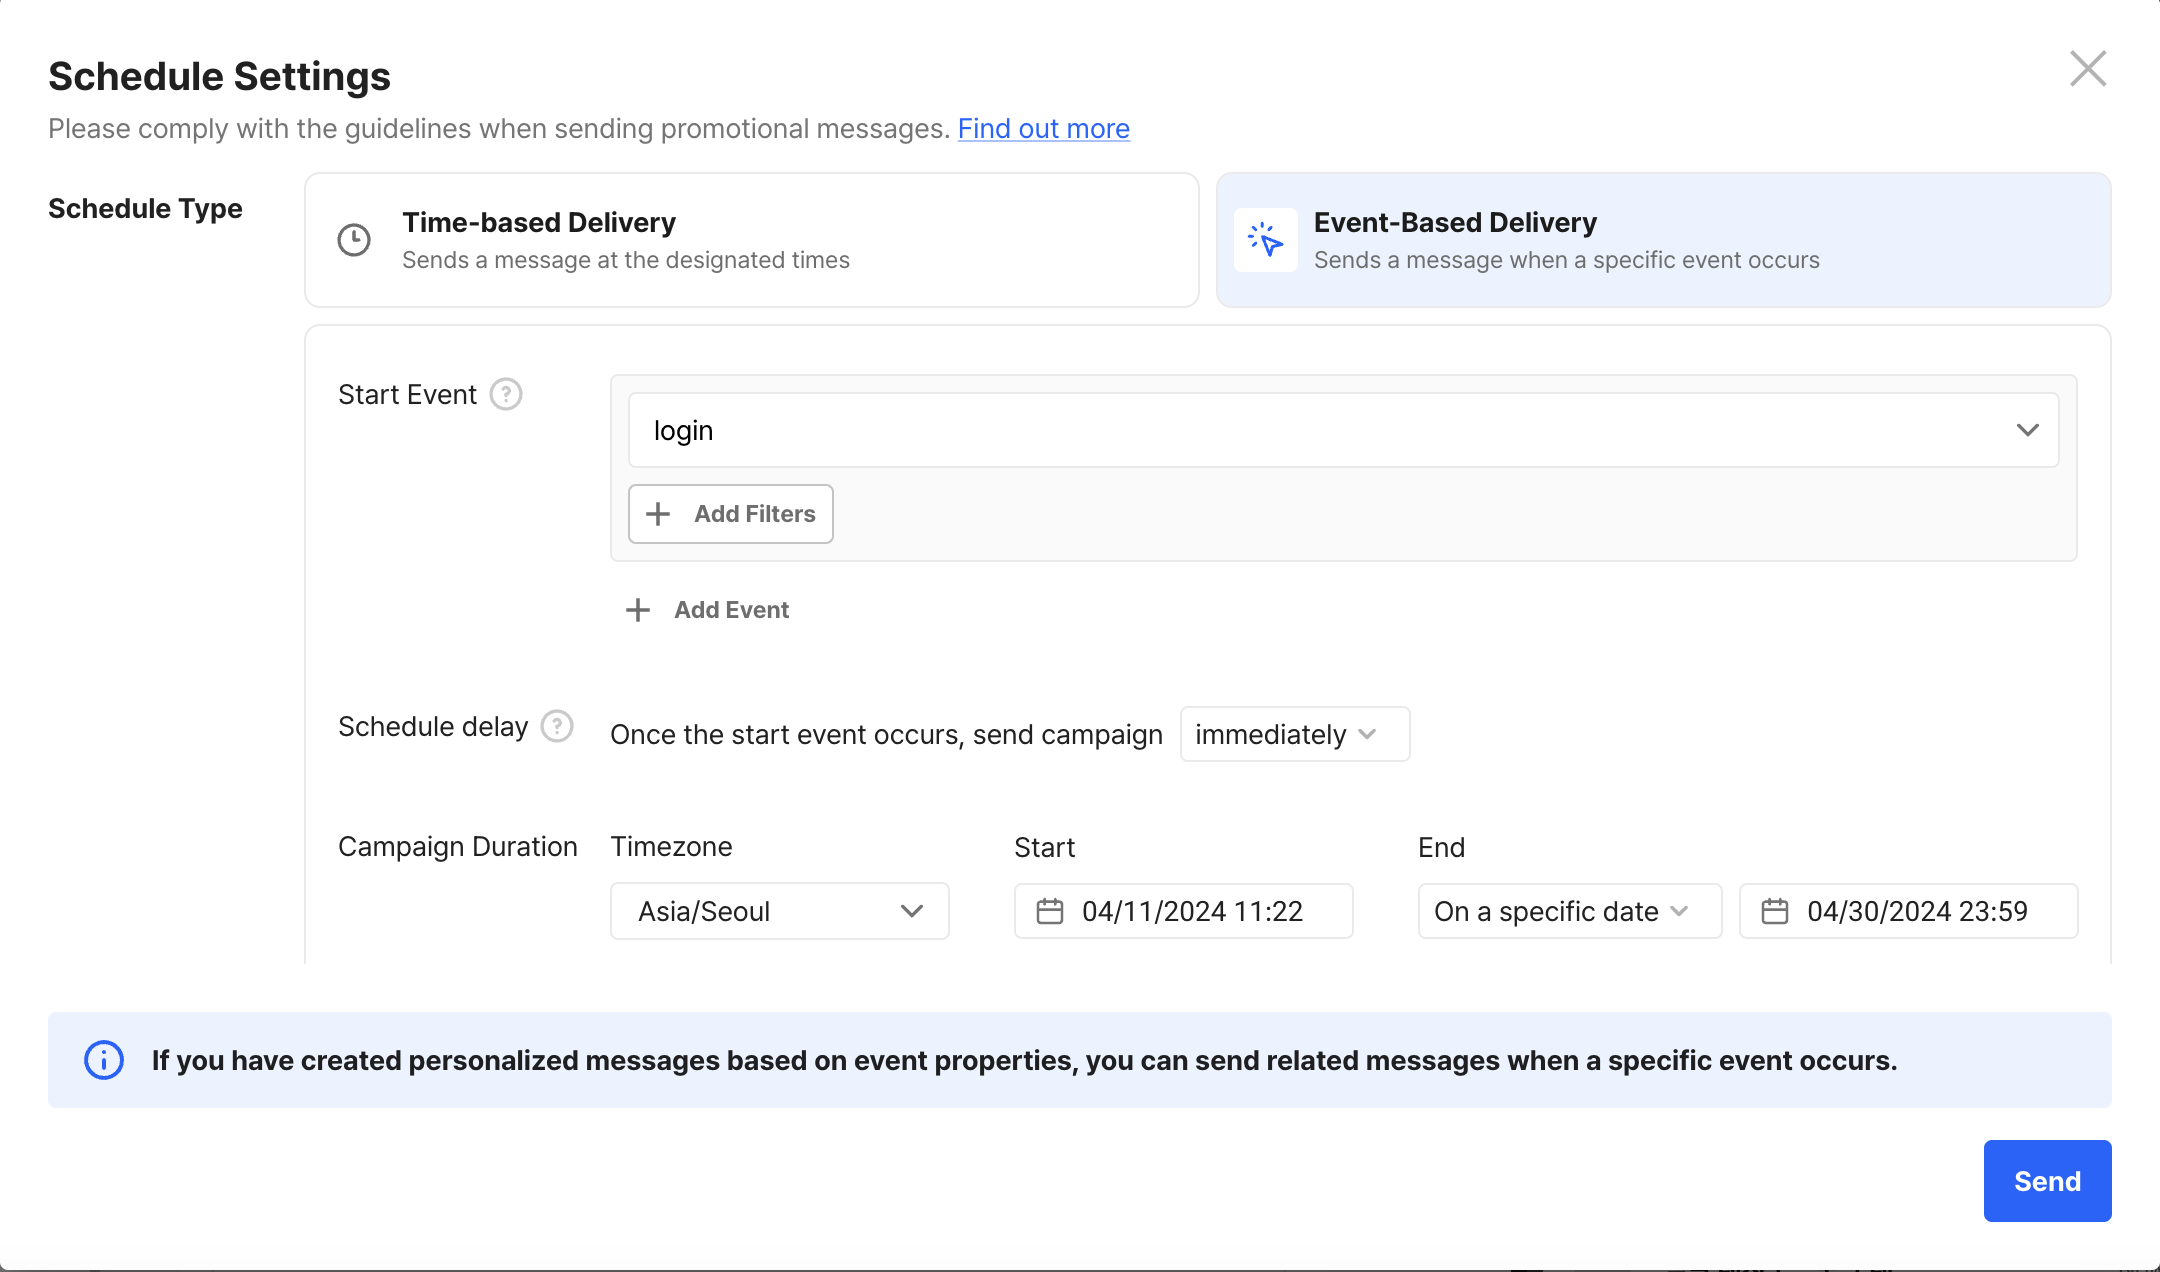
4-4. Event-based Delivery
Sends a message triggered by the occurrence of a specific event. This allows you to create campaigns tailored to the customer journey.
It may take a few minutes for the message to be actually sent to users after the event occurs.
Event-based Delivery
- Event
- Select the desired event from the list.
- You can also add property filters or set multiple events with OR conditions.
- Delay Time
- Send the push message immediately after the event occurs or after a specified delay.
- Campaign Period
- Start: Set the start date and time for delivery.
- End
- No End: Do not specify an end date. In this case, you need to manually end the campaign.
- Until a Specific Date: Set a desired end date.
- Duplicate Delivery
- By default, the same campaign is sent only once to the same user.
- If you want to allow duplicate delivery, you can set the interval (in minutes, hours, days, weeks, or months) after which the message can be resent to the same user, minimizing negative user experiences.
The campaign statistics area is displayed from the scheduled delivery status.
If you want to cancel the scheduled delivery, click the Deactivate button to modify it.
If you want to stop the campaign, click the End button to end the campaign.
Scheduled Delivery Status
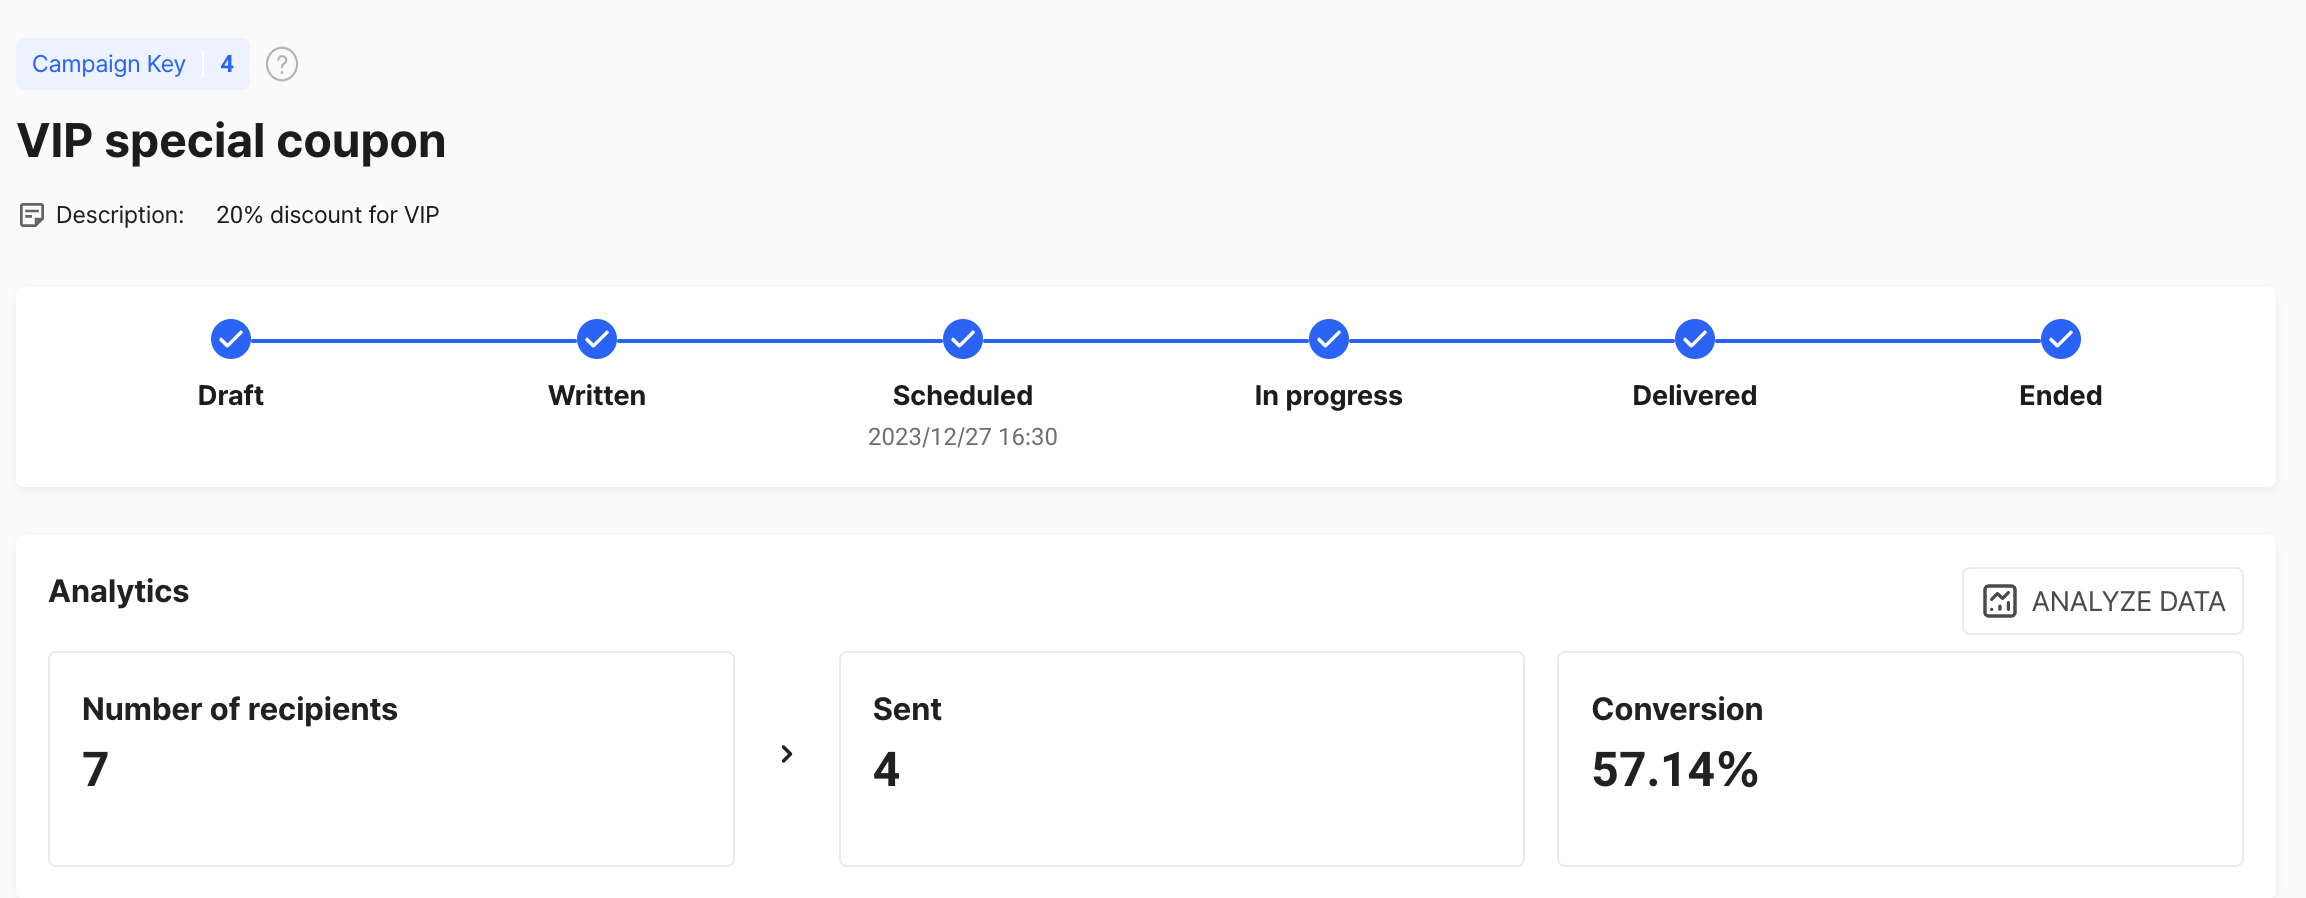
Step 5. Delivery Complete
Once the message delivery is complete at the scheduled time, the campaign status will automatically change.
You can also check the actual collected statistics in the campaign statistics area. You can briefly check the number of recipient devices, the number of deliveries, and the delivery conversion rate. By clicking the Analyze in Detail button, you can conduct an in-depth campaign analysis. For detailed information, please refer to the Analyze Push Message Campaign Performance guide.
Completed Campaign
Updated 18 days ago