Ruby SDK
This document provides information on using the Ruby SDK.
Before You Read
If this is your first time working with an SDK, please refer to the What is a SDK? document
There are several keys mentioned in this document. In order to find out where to obtain these keys and the roles of each key during the SDK integration, please read Keys Used by SDK Functions before you read this document.
Ruby SDK Functions
The SDK has two main functions.
-
Traffic distribution
This is a function used by A/B testing, which allocates and assigns users to specific test groups, such as A, B, C, and returns the distributed group. Sends assigned group information to the hack to record the user's exposure to A/B testing. -
Track and send user events
The track feature used in both A/B Testing and Data Analytics allows you to record the specific actions by users on the website/page/app and sends this information to Hackle to derive results from the experiment or carry out funnel analysis.
Manage user identifiers
A user identifier is used to uniquely identify a user. The React SDK includes the ability to internally manage user identifiers. This document uses internally managed identifiers.
If you want to specify and use a user identifier yourself, please check the Managing User Identifiers document.
Sequence of SDK Integration and Configuration
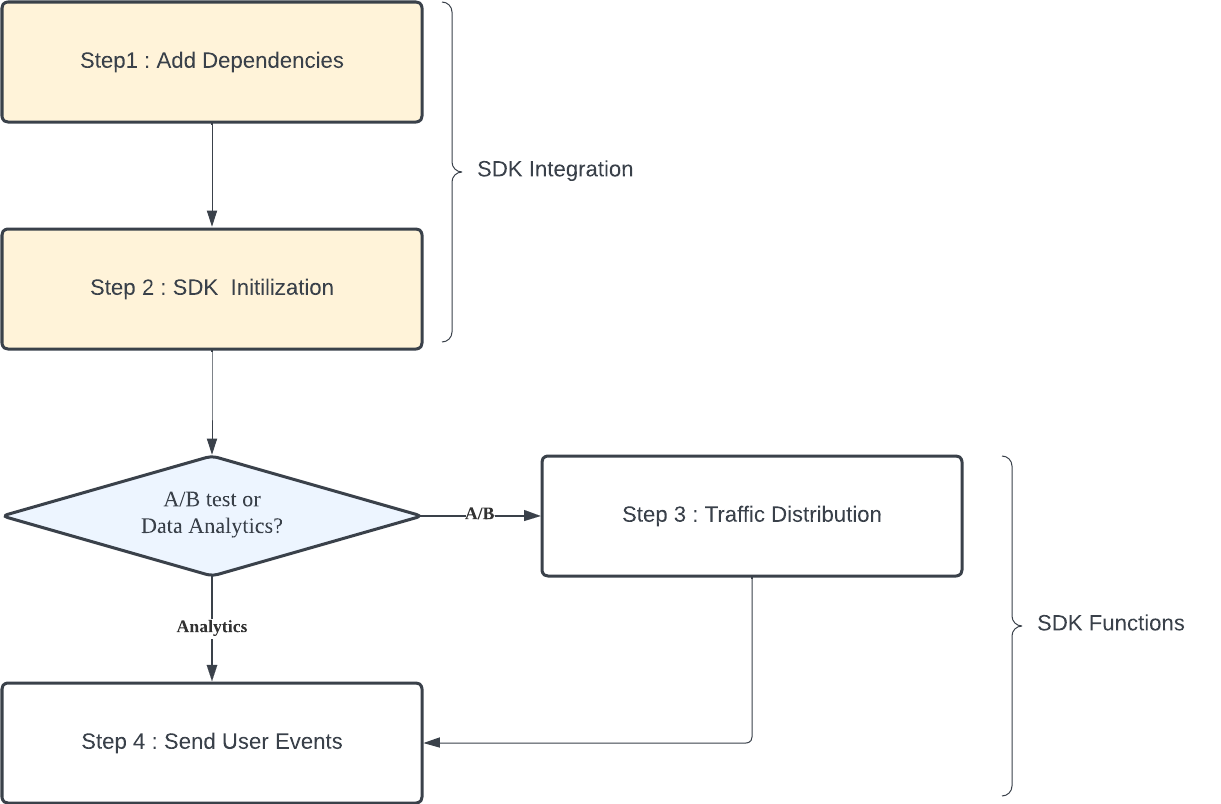
SDK integration
SDK integration is required to apply the SDK functions.
This applies to steps 1 and 2, and must be passed during the initial integration phase.
A/B test or Data Analytics?
Depending on whether the purpose of Hackle platform integration is forA/B testing or Data Analytics, there are differences in the SDK functions that need to be applied.
- A/B test: Apply in the order of 3 steps → 4 steps.
(1) Apply the traffic distribution function to the place where A/B testing is to be performed.
(2) Apply the send user event function to the place to track the metric of A/B test. - Data Analytics: Apply step 4.
In the course of the funnel, apply the function to send user events where the events to be analyzed occur.
SDK integration
Step 1: Add Dependencies
Think of this step as importing our SDK into your codebase. To use our Hackle services add the following dependency code and import our SDK.
gem install hackle-ruby-sdk -v '~> 1.0.0'Step 2: Initialize SDK
Once you have imported the dependencies, in order to start using the Hackle SDK you must initialize the SDK. During this step, we get the information needed for SDK integration from the Hackle Server and store it in the SDK.
hackle_client is a class that provides methods for using SDK functions.
The SDK key can be found in the SDK integration in the dashboard of Hackle service.
Instantiation
require 'hackle-ruby-sdk'

# Enter the SDK Key in the <YOUR_SERVER_SDK_KEY>.
hackle_client = Hackle.client(sdk_key: '<YOUR_SERVER_SDK_KEY>')
Instantiate hackle_client by passing the SDK key.
hackle_client periodically synchronizes with the Hackle server as a background task to constantly obtain the necessary information.
hackle_client must be a singleton patternhackle_client manages the status internally to distribute traffic into test groups right away without blocking the calling thread. It uses additional resources for this. Instead of instantiating a new client for every request, it should be managed as a single instance throughout the application lifecycle.
App close
hackle_client.closeThe close() method must be called when the application is closed. This process releases the resources in use and sends the remaining events. Events may be lost if the application is closed without this process.
Using the Hackle Ruby SDK with Rails
If you want to use the SDK in your Rails application, you can configure hackle_client through the code below.
# config/initializers/hackle_client.rb
# Enter the SDK Key in the YOUR_SERVER_SDK_KEY.
$hackle_client = Hackle.create(sdk_key: 'YOUR_SERVER_SDK_KEY')
at_exit { $hackle_client.close }
You can access hackle_client through the code below in the controller.
class OrdersController
  def show
    $hackle_client.variation(...)
  end
end
When the application starts, the SDK creates multiple threads. Each thread has an infinite loop that batch processes and dispatches events in the background and fetches A/B test information. If the SDK is used on a web server that creates multiple child processes (eg Puma, Unicorn/workers> 0), the application server creates child processes but does not re-create the threads existing in the parent process. Therefore, when running in cluster mode in Unicorn, Puma, etc., the SDK must be additionally created after a child process or Worker is created.
Unicorn
If you are using Unicorn in cluster mode, the settings below should be added.
# config/unicorn.rb
# Enter the SDK Key in the <YOUR_SERVER_SDK_KEY>.
after_fork do |server, worker|
    $hackle_client = Hackle.client(sdk_key: '<YOUR_SERVER_SDK_KEY>')
end
Puma
If you are using Puma in cluster mode, the settings below should be added.
# config/puma.rb
# Enter the SDK Key in the <YOUR_SERVER_SDK_KEY>.
on_worker_boot do
    $hackle_client = Hackle.client(sdk_key: '<YOUR_SERVER_SDK_KEY>')
end
Apply SDK function
- Note: SDK functions can be applied after SDK integration is completed.
Step 3: Traffic Distribution
This step is for A/B testing only.
Distribute users to test groups in each specific experiment key, and write the logic for each test group.
Test GroupsThe test groups are basically the different groups that are exposed to the versions (features, screens, algorithms, etc) of a page of an experiment. Test groups include both the control test group A and treatment test groups B, C, D, etc., that are exposed to the "improved" versions of the pages.
The test groups can be set on the dashboard and further information on the test groups can be found on the rithms, etc) of a page document.
By passing the experiment key and user identifier to the variation() method, you can distribute users and receive the results of the distribution. After that, you can implement the logic for each test group.
The experiment key is a unique number for each A/B test and can be found on the dashboard within the Hackle service.
In the example code below, we are passing an experiment key of 42, and there are two test groups, A and B.
# In an A/B test with an experimental key of 42,
# determines which test group to assign the user with an identifier of "ae2182e0".
# For undetermined cases, the user is returned to test group A.
user = Hackle.user(id: 'ae2182e0')
variation = hackle_client.variation(experiment_key: 42, user: user)

# Logic for the assigned test group
if variation == 'A'
    # Logic for test group A
elsif variation == 'B'
    # Logic for test group B
end
Deduplication of exposure eventIf you use Backend-side SDK, Any successive Exposure events within one minute for same A/B test from single user will be counted as one.
Step 4: Track User Events
Track and send user-induced events for measuring metrics and analyzing results.
User events can be sent by passing the event key and user identifier to the track() method. In cases where you would also like to know the value, you can put a numeric value in value and send it together as user events.
- the
valuecan only be in the form of numerical values.
Look at the example below.
# Sends out an event called “purchase” that is triggered by a user with an identifier of “ae2182e0”

# Example 1: Send only the event key
event = Hackle.event(key: 'purchase')
user = Hackle.user(id: 'ae2182e0')
hackle_client.track(event: event, user: user)

# Example 2: Send the event key and numeric value together
event = Hackle.event(
  key: 'purchase',
  value: 32000.0      # Enter the numeric value to collect along with the event key in 'value'
)
user = Hackle.user(id: 'ae2182e0')
hackle_client.track(event: event, user: user)
Suppose you have defined an event key called 'purchase' to collect the event when the user presses the purchase button. From the above examples, example 1 is showing a case where only the event key is being sent for the purchase action, while example 2 shows a case where both the purchase event key and the purchase amount is being collected by putting in the 'value' to collect information on the exact purchase amount.
Updated 8 months ago